6502.org Forum  Projects  Code  Documents  Tools  Forum
It is currently Sun Nov 24, 2024 3:02 pm

All times are UTC


Post new topic Reply to topic  [ 16 posts ]  Go to page 1, 2  Next
Author Message
PostPosted: Sat Sep 21, 2019 7:00 am 
Offline

Joined: Mon May 21, 2018 8:09 pm
Posts: 1462
I've been offered a Dataman S4 programmer, which needs a bit of TLC to make it work properly again after some time on the shelf. A key feature of the S4 is that data can be entered directly into it by hand, for example a few dozen bytes of bootstrap loader, as well as accepting bulk data over a serial line, so this is directly relevant to getting my 6502 projects off the ground.

It's a fairly common set of things that go wrong with that unit - it needs new batteries and the power jack is broken. It powers up just fine if power is applied via the internal battery connector, but it needs a functioning battery before it can run from external power (a poor design choice, IMHO), and the jack is of a type that's not very robust and also hard to find a direct replacement for. The manufacturer's advice on choosing a non-official PSU also suggests that the internal battery charger is rather primitive, which seems likely to cause premature failure of the battery - official replacements being rather expensive to obtain, especially with international shipping.

So, of course, I set about redesigning it. It should, after all, be entirely feasible to bypass the original power jack and power the unit entirely from the internal battery connector.

The official 7-cell NiCad pack offers about 5 watt-hours of capacity, but I can get 7.2 Wh from just three modern NiMH AA cells, costing a handful of euros from my local supermarket. The only problem is that the voltage has to be stepped up from 3.6V nominal to the 9V expected. NiMH cells are also a bit more finicky to charge in-situ than NiCad, and a 3-cell AA holder takes up slightly more space than the same number of cells in pack format. Armed with measurements of the original battery compartment, I determined I could fit a 47x53mm PCB in beside a 3-cell holder.

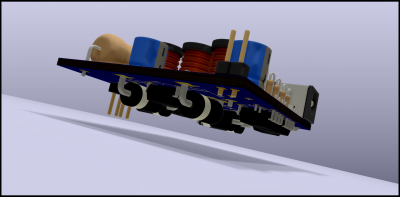
That's not a lot of space to build a combined PSU and battery charger into, with two parallel supply paths being needed so that the unit can be used without disrupting the battery charging logic. Here's what it looks like when you try:
Attachment:
dataman-battery-1.png
dataman-battery-1.png [ 462.46 KiB | Viewed 1815 times ]
Technically, that should work, but with through-hole components on both sides and consequently the solder points for some components being hidden by others, assembling it is likely to be difficult. I'm also not entirely happy with relying entirely on the 10µF low-ESR capacitors I was able to squeeze on there, given how little capacitance the S4's motherboard has on it, and thus how much it must have relied on the original batteries for ballast when running on mains power (another factor possibly contributing to short lifetime).

Closer examination of the S4's casing suggests that if a thin plastic partition is cut away, it might be possible to fit the battery holder in a more favourable orientation, leaving about 10mm more space for the PCB. That doesn't sound like a lot, but in this context it means being able to arrange the components for easier assembly at the very least. It also raises the possibility of fitting some larger capacitors, maybe off-board and tucked into random corners of the case, just to make sure the power delivered is clean.
Attachment:
dataman-battery-schema.png
dataman-battery-schema.png [ 103.24 KiB | Viewed 1815 times ]
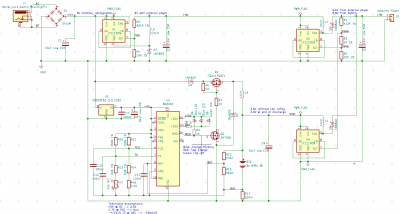
The top half of the schematic is the direct path from mains input to unit power, and should be able to operate without the bottom half (or the batteries) fitted. Essentially it's a rectifier for the original unregulated AC input, then a buck-converter down to 6V regulated, and a boost-converter back up to about 9.6V. On the potential divider selecting that last voltage, there's a second tap which offers the correct feedback for 8.8V, for the benefit of the otherwise identical boost-converter attached to the battery. The latter should thus go idle whenever mains power is available, operate in discontinuous mode for standby and "edit" mode, and in continuous mode for the 180mA power consumption specified for actual programming operations.

It may seem excessive to have effectively five regulator circuits, four of which need a relatively beefy inductor and flyback diode, for this job. Perhaps I can find a way to combine the two on the direct power path, although it'll have to be a different regulator than the LT1110, as the datasheet advises against using it for stepping down to move than 6V. The unregulated input voltage might sag under combined charging and programming loads, far enough that a simple LDO regulator wouldn't hold the output voltage out of the boost converter's target, and the load this would impose on the battery would likely trip the charge controller to prematurely end the charge cycle. Using separate buck and boost stages avoids this scenario, but for example a SEPIC topology could also handle it with fewer components.

The complicated part remaining is the battery charger, based around a BQ2004 charge controller. This itself requires a 5V supply, but at low enough power that using a simple linear regulator is sensible. To the lower-left of this is a resistor network to calibrate the thermistor (to be inserted into the battery pack somehow) with sane temperature limits and the BQ2004's expected voltage relationships for dT/dt detection. Configuration pins are tied as appropriate for a NiMH charge algorithm (peak voltage detection and top-off charge enabled, C/2 rate during fast-charge phase), and to make the LEDs on the right properly distinguish all the important phases of charging. To the lower right, a potential divider configures the dV/dt sensor for a 3-cell battery, and the current-sensing resistor selects 1000mA charging current. Finally, the MOD output is used to drive a buck-switching MOSFET through a simple gate driver.

This arrangement of the BQ2004 is much simpler than the suggestion in the most relevant application note I could find. As well as completely unnecessary (and rather unclear) provisions for charging Li-Ion battery packs with the same circuit as for NiMH, it used an active gate driver circuit to accelerate switching off the MOSFET at the end of each pulse - which I consider completely unnecessary, with a simple resistor being sufficient to discharge the gate rapidly when the driver is switched off. For all that complication, the application note left the LED outputs completely unused.


Top
 Profile  
Reply with quote  
PostPosted: Sat Sep 21, 2019 8:10 am 
Offline
User avatar

Joined: Fri Aug 30, 2002 1:09 am
Posts: 8546
Location: Southern California
Chromatix wrote:
A key feature of the S4 is that data can be entered directly into it by hand, for example a few dozen bytes of bootstrap loader, as well as accepting bulk data over a serial line, so this is directly relevant to getting my 6502 projects off the ground.

Bravo! I like these things that can get you going without depending on things like a particular OS on a PC. The first commercially made EPROM programmer I used was a Bytek Writer. It had a keypad and LED display, and also an RS-232 port, and I used it with my HP handheld computer.

Since this is just for a one-off, I would just use a wall wart, and if not regulated, then add a linear regulator in a TO-220 case, and forget about the batteries. I doubt you'll be using it while camping, riding bike, etc.. :lol:

_________________
http://WilsonMinesCo.com/ lots of 6502 resources
The "second front page" is http://wilsonminesco.com/links.html .
What's an additional VIA among friends, anyhow?


Top
 Profile  
Reply with quote  
PostPosted: Sat Sep 21, 2019 1:45 pm 
Offline
User avatar

Joined: Wed Mar 01, 2017 8:54 pm
Posts: 660
Location: North-Germany
There is a "PWR_FLAG" connection (?) below U4p4 that annoys me somehow. There are two others above U1 and U2 - these will not cause a single net ?
But why don't you omit U4 entirely and put BT2+ and the output of U1 via two (schottky)-diodes together charging a 100 or more µF/10V cap?

Regards,
Arne


Top
 Profile  
Reply with quote  
PostPosted: Sat Sep 21, 2019 4:27 pm 
Offline

Joined: Mon May 21, 2018 8:09 pm
Posts: 1462
The PWR_FLAGs are there only to satisfy KiCad's Electronic Rules Checker (ERC) which, without them, can only see that the power outputs of each stage are on the wrong side pf a passive component (an inductor, usually) from the power inputs of the next stage. They don't themselves represent a common connection, any more than adding a "single pin connector" component would.

As for using a diode to supply battery voltage to a single boost converter, I did consider that, but losing half a volt of power-Schottky forward drop from the 3.0V end-of-discharge voltage is actually quite painful for designing the booster. That diode would also be dissipating a large fraction of a watt during each programming operation. It's probably easier to reduce the number of converters by combining the functions of U1 and U2.


Top
 Profile  
Reply with quote  
PostPosted: Sun Sep 22, 2019 12:22 am 
Offline

Joined: Mon May 21, 2018 8:09 pm
Posts: 1462
Incidentally, a second feature of the S4 is that it can be used to program GALs, and small CPLDs like the ATF750C. To do so, it does need an adapter which I don't yet have; Dataman sell it for a cool £200 + P&P. But maybe I can reverse-engineer a way to build one for less. That will come later, of course, when I have the base unit working reliably.

At some point I also want to build a simple bench-type PSU, with selectable voltage and current limits and explicit voltage/current readouts. The commercial ones have performance I don't need and prices I can't afford for such a straightforward task. Being able to regulate the output of an ordinary wall-wart is sufficient, and versions of these same converter structures should do the job.


Top
 Profile  
Reply with quote  
PostPosted: Sun Sep 22, 2019 12:31 am 
Offline
User avatar

Joined: Wed Mar 01, 2017 8:54 pm
Posts: 660
Location: North-Germany
Chromatix wrote:
The PWR_FLAGs are there only to satisfy KiCad's Electronic Rules Checker (ERC) which, without them, can only see that the power outputs of each stage are on the wrong side pf a passive component (an inductor, usually) from the power inputs of the next stage. They don't themselves represent a common connection, any more than adding a "single pin connector" component would.
Ah ok, just looking similar to power taps.

Chromatix wrote:
As for using a diode to supply battery voltage to a single boost converter, I did consider that, but losing half a volt of power-Schottky forward drop from the 3.0V end-of-discharge voltage is actually quite painful for designing the booster. That diode would also be dissipating a large fraction of a watt during each programming operation. It's probably easier to reduce the number of converters by combining the functions of U1 and U2.
Don't know how much space you have and whether you can handle SMD components. Using an "industrial cell"
Attachment:
XCELL139353_DS.pdf [360.56 KiB]
Downloaded 79 times
and something like LT4090/4091
Attachment:
4091fa.pdf [624.14 KiB]
Downloaded 89 times
and finally bump the voltage up to 9V with your LT1110 might fit as well.

Regards,
Arne

(edited, I quoted the wrong post :oops:)


Top
 Profile  
Reply with quote  
PostPosted: Sun Sep 22, 2019 12:53 am 
Offline

Joined: Mon May 21, 2018 8:09 pm
Posts: 1462
I've never liked Li-Ion batteries; they may have more capacity per unit weight/volume, but they have a shorter lifetime in years and can be a fire hazard if not excruciatingly well manufactured. They're also much more difficult to ship than nickel-based batteries; for example, when travelling I'd have to keep it in hand-luggage rather than in the hold.

At one point, many years ago, I had the opportunity to graft together the NiMH cells from two decade-old laptop batteries and attach them to the original laptop. This was a machine that, on a good day with brand-new batteries, could manage about an hour of runtime on each individual battery. With two batteries in parallel, though, it managed five hours, even though they were by then extremely old - Li-Ions would have had to be replaced three times over by then. The original batteries had simply been under-sized from the start to meet size and weight constraints, so that their internal resistance crippled their usable capacity. By doubling the number of cells, the capacity and lifetime would have been improved to the point where they didn't need to be swappable.


Top
 Profile  
Reply with quote  
PostPosted: Sun Sep 22, 2019 4:19 am 
Offline

Joined: Sat Jun 04, 2016 10:22 pm
Posts: 483
Location: Australia
Depends on which Li-Ions you're talking about. The ones in the uploaded datasheet are what are known as LiPo(Lithium Polymer) types in the RC hobby(the nominal 3.7V gives it away). Those are the ones that catch fire, explode, and die after a few hundred cycles, but they get used a lot because they have high initial capacities, which looks good in the marketing.

On the other hand, LiFePO4 types are far stabler. They'll outlast equivalent LiPo packs, and I've seen the same cells withstand RC aeroplane use for at least a couple of years, and that commonly has power draw in the tens of amps from the battery; it's borderline abuse, and they withstand it for so long without noticeable capacity loss. I've been using old cells that are starting to degrade as low-power battery packs for a while now, and they tend to last a long time. The cells just don't die, and when they do, they don't turn into incendiary devices.
That said, they're not a straight upgrade. LiFe batteries have less capacity for their volume and mass than LiPos. They also have lower nominal voltages(3.3v as opposed to 3.7 out of a LiPo).

I think it might be worth looking at LiFe cells like the 18650(1500mAh) and the 14500(600mAh), if you're looking to keep the thing running on battery power. They're bigger, and a bit harder to find a charger for, but they take much longer to degrade, and are far less of a hazard.
But if keeping battery power is not a concern, I'd just power it via the battery connector and a regulator.


Top
 Profile  
Reply with quote  
PostPosted: Sun Sep 22, 2019 10:10 am 
Offline

Joined: Mon May 21, 2018 8:09 pm
Posts: 1462
One hefty redesign later, I now have a pair of Cuk converters based on the LT1372 (which has specific support for negative-voltage feedback) in place of the two boost and one buck converters based on the LT1110. This means that the board now technically provides a -9V supply instead of +9V, but this ultimately doesn't matter. A big advantage of the Cuk topology is that the current ripple is largely confined to the switching elements and the coupling capacitor, and is quite thoroughly damped at both input and output - the attendant disadvantage is needing more components. Cuk converters allegedly work best with pairs of coupled inductors, but these seem to be hard to come by in through-hole format, so I've used individual inductors instead.

The BQ2004 still uses the linear regulator and buck-switching MOSFET for the actual charging circuit - that hasn't changed at all. I did correct the connection of one of the LEDs, for which I must have momentarily read the wrong part of the table in the datasheet.

Speaking of ripple, I decided that omitting the 4700µF capacitors I originally specified for both input and output would lead to unacceptable performance. In particular, the fact that the input power is AC means I have to hold the voltage up there under at least a half-amp load for as much as 10ms between peaks. Even with the larger board size, however, they won't fit in the battery compartment. So I've had to make provision for attaching them by flying cables, so that a suitable place can be found for them elsewhere.

The larger PCB area I mentioned did allow me to move all components except the BQ2004 to the front side of the board. This limits the assembly problem to a tractable subset, for which I've worked out an assembly order that should work with hand tools.


Top
 Profile  
Reply with quote  
PostPosted: Sun Sep 22, 2019 1:13 pm 
Offline
User avatar

Joined: Wed Mar 01, 2017 8:54 pm
Posts: 660
Location: North-Germany
DerTrueForce wrote:
Depends on which Li-Ions you're talking about. The ones in the uploaded datasheet are what are known as LiPo(Lithium Polymer) types in the RC hobby(the nominal 3.7V gives it away). Those are the ones that catch fire, explode, and die after a few hundred cycles, but they get used a lot because they have high initial capacities, which looks good in the marketing.
Actually the one I have posted has a protection circuit inside - which renders it useless for RC application - ways too weak :) . And for Chromatix' application this protection is unneccessary as well - the charger does all the protection that is needed. Perhaps discharge might be critical, but I assume the currents would be below 2A.

DerTrueForce wrote:
On the other hand, LiFePO4 types are far stabler. They'll outlast equivalent LiPo packs, and I've seen the same cells withstand RC aeroplane use for at least a couple of years, and that commonly has power draw in the tens of amps from the battery; it's borderline abuse, and they withstand it for so long without noticeable capacity loss. I've been using old cells that are starting to degrade as low-power battery packs for a while now, and they tend to last a long time. The cells just don't die, and when they do, they don't turn into incendiary devices.
That said, they're not a straight upgrade. LiFe batteries have less capacity for their volume and mass than LiPos. They also have lower nominal voltages(3.3v as opposed to 3.7 out of a LiPo).

I think it might be worth looking at LiFe cells like the 18650(1500mAh) and the 14500(600mAh), if you're looking to keep the thing running on battery power. They're bigger, and a bit harder to find a charger for, but they take much longer to degrade, and are far less of a hazard.
But if keeping battery power is not a concern, I'd just power it via the battery connector and a regulator.
I agree 100%

Actually, so far, I never had an issue with LiPos. Burning battery packs - I only saw them on TV. When badly treated they wear out as fast any other battery. Their biggest advantage imho is being single cell. And that is exactly what makes NiCad and NiMH packs fails so quickly: imbalanced capacity and therefor imbalanced (dis)charge.
It is just a week ago that I had replaced NiMHs AAA cells from two cordless phones because one starts to fail, issuing "low batt" and seconds later pretending they are fully charged. I remember that I have checked their initial capacity, because I doubt that they have 730 mAh as printed - they have had (750..790) ! Well, I used the last night to double check this: two years of "usage" causes them to have 680/565/660/700 mAh now.
I am shure the phones do not overcharge the batteries. But there is (for certain) no "load balancing" as the center tap isn't connected to anything. So any initial imbalance will grow with every use. And this will most likely happen to Chromatix' batteries as well - much much earlier than a single cell would do.

Regards,
Arne


(edit (1): diction corrected)


Last edited by GaBuZoMeu on Mon Sep 23, 2019 1:54 pm, edited 1 time in total.

Top
 Profile  
Reply with quote  
PostPosted: Sun Sep 22, 2019 7:33 pm 
Offline

Joined: Mon May 21, 2018 8:09 pm
Posts: 1462
With Cuk converters, I would expect the load on the battery to reach maybe 600mA when programming. But that's not the point.

What I'm trying to do here is replace a 7-cell NiCad pack, which is expensive to replace like-for-like, and wears out quickly because the charger is as dumb as a box of rocks and the unit relies on the battery to ballast a questionable PSU. I've established from personal experience that NiMH cells last *far* longer, even in multi-cell strings, when treated properly. Even if a capacity imbalance develops over time, the cells can be reconditioned in an individual-cell smart charger to extend their useful life.

I'm going to hazard a guess that the cordless phones use a simple charging circuit designed for NiCads, without adjustment for NiMH cells' need for greater finesse at end of charge. Probably they spend most of time in the base station and therefore on trickle charge - and the appropriate rate of trickle charge is much lower for NiMH than for NiCad. Too much current there will induce memory effect which can only be cured by individual-cell reconditioning, and that's probably what you've run into. How long do they claim for a recharge? Is there a thermistor actually in the battery compartment? Is there a proper charge-management IC, and does it support "peak voltage" or only "negative delta-V" detection? If not, then it is actively damaging your cells and you should be glad they lasted as long as two years.

But at least you didn't have to worry about them catching fire.


Top
 Profile  
Reply with quote  
PostPosted: Mon Sep 23, 2019 10:29 am 
Offline

Joined: Mon May 21, 2018 8:09 pm
Posts: 1462
One thing I can do to help the device fit in the existing battery compartment is to move down to AAA cells. These still have a 750mAh capacity in NiMH type, which means they can still reasonably supply the 600mA expected maximum load at most states of charge. The overall battery runtime will be shortened compared to the original 7x AA pack, but that is of lesser concern now than making assembly relatively easy.

The smaller capacity does mean I have to change the sense resistor which sets the charge current - but I think that's the only circuit design change needed. The major benefit is that the 3x AAA holder should fit in the battery compartment without having to cut away one of its edges, where the 3x AA holder would only do so if turned lengthwise and thus leaving very little space for the electronics.

Meanwhile I'm redoing the PCB layout from scratch to make it a bit less chaotic. Turns out it really helps to start with the C-L-C-L/D-C chains of the Cuk converters, which are now in a pleasingly symmetrical line with nice short traces, both between themselves and to the controllers. This also gives me the opportunity to move the indicator LEDs to the board edge, where they might actually be made visible, instead of being crammed into the space that happened to be available in the middle of the old layout.


Top
 Profile  
Reply with quote  
PostPosted: Tue Sep 24, 2019 1:20 am 
Offline

Joined: Mon May 21, 2018 8:09 pm
Posts: 1462
Here's the updated PCB, with battery holder for scale:


Attachments:
dataman-battery-1.png
dataman-battery-1.png [ 1.03 MiB | Viewed 1611 times ]
dataman-battery-2.png
dataman-battery-2.png [ 699.51 KiB | Viewed 1611 times ]
Top
 Profile  
Reply with quote  
PostPosted: Tue Oct 01, 2019 8:35 pm 
Offline

Joined: Mon May 21, 2018 8:09 pm
Posts: 1462
After getting LTspice to work and fiddling around with it a bit, a few refinements revealed themselves as being desirable. One of the more visually obvious changes is that the 10µF low-ESR caps are now ceramic discs instead of electrolytics. Three extra diodes also put a rough clamp on the current draw through the direct channel via the compensation pin of the switcher, as the combination of the relatively high impedance of the PSU and the 100Hz ripple would otherwise result in the undervoltage lockout triggering during startup and making the transients look *horrible*. This also has the happy side-effect of causing a smooth handover of duties when external power is removed. The battery booster merely relies on the internal current limiter; applying a further limit to that would risk not being able to supply enough power during a programming cycle.

Also obvious, as it takes up a lot of a previously clear scrap of board, is an extra 14-pin IC which turns out to be quite important. It's a 74HC132 featuring four Schmitt-triggered NAND gates, which I'm using as a slow, low-power oscillator. Its job, when enabled, is to put the battery booster into a roughly 1% duty cycle - because these switching converters have a roughly 4mA parasitic drain unless you actively shut them down, at which point that shrinks to a dozen microamps, comparable to the standby power drain of the whole programmer unit (probably just keeping an SRAM chip powered up). Without this refinement, therefore, the standby time would go down to under a week on fresh batteries, far less than the 8 weeks claimed for the original battery pack (which is probably dominated by self-discharge). I'm content with having a month of standby, rather than two months - that's comparable to the change in overall battery capacity - but cutting it to under a week was something I had to address.

This low-power mode doesn't matter for the direct converter, which draws all its power from the external source; likewise the battery charger is only powered when external power is present. I will need to check carefully whether I can derive the enable signal from the original power switch, or whether I'll need to fit an extra one to enable the long-standby mode. For the moment I've just designed in a header for an SPDT switch.

Less obvious changes include physically (but not electrically) reversing some freewheel diodes to shorten their current loops, and adding small capacitors on the "high" side of some potential dividers to act as a D term in the PID sense, reducing overshoot and improving load regulation. The transfer capacitors in the middle of the Cuk structures are also now of smaller value, as is the main output capacitor; the latter should make it easier to fit into random niches in the casing.


Top
 Profile  
Reply with quote  
PostPosted: Thu Jan 14, 2021 4:15 pm 
Offline

Joined: Wed Sep 02, 2020 11:03 pm
Posts: 1
Chromatix wrote:
Here's the updated PCB, with battery holder for scale:


Hi,

I'm thinking about implementing the mod in my programmer. Have you had a chance to post your design files anywhere?

Thanks
Kris


Top
 Profile  
Reply with quote  
Display posts from previous:  Sort by  
Post new topic Reply to topic  [ 16 posts ]  Go to page 1, 2  Next

All times are UTC


Who is online

Users browsing this forum: No registered users and 18 guests


You cannot post new topics in this forum
You cannot reply to topics in this forum
You cannot edit your posts in this forum
You cannot delete your posts in this forum
You cannot post attachments in this forum

Search for:
Jump to: