Always wanted to do digital circuitry, and the current course I am taking in university has a lot to do with it (I am doing a CompSci major). I understand a lot of the hardware (if that's the right word) about microprocessors and various digital logic devices, but nothing about electrical engineering. However I would like to do some real world projects.
I began by desoldered a 6502 variant from the original Nintendo (Only thing with a 6502 I can part with, it's broken). The instruction set is the same, and you get a few bonus built in features.
-I wired VCC to 5v, and Grn to ground.
-I wired all the data bus pins to grn for a no-op instruction
-Wired VCC/Grnd to a ossilator, and wired the clock output, to the 6502's input.
-I grounded NMI and IRQ, and put the first 4 address lines through leds.
Reset is my biggest issue. I don't have a button on me right now, but would manually switching the wire between high, to low, back to high work?
I tried doing this, but if RESET is 5v, all lines are active, and if grounded all lines are low.
Is this because the CPU is cycling too fast to see, or is it not working properly?
Just a note, the NES 6502 divides clockspeed by 12, so this may also be an issue, since I have a 5.37mhz oscillator, it's running at around 448khz.
Beginner in digital circuitry
-
BigDumbDinosaur

- Posts: 9425
- Joined: 28 May 2009
- Location: Midwestern USA (JB Pritzker’s dystopia)
- Contact:
Re: Beginner in digital circuitry
ioncannon wrote:
Always wanted to do digital circuitry, and the current course I am taking in university has a lot to do with it (I am doing a CompSci major). I understand a lot of the hardware (if that's the right word) about microprocessors and various digital logic devices, but nothing about electrical engineering. However I would like to do some real world projects.
I began by desoldered a 6502 variant from the original Nintendo (Only thing with a 6502 I can part with, it's broken). The instruction set is the same, and you get a few bonus built in features.
I began by desoldered a 6502 variant from the original Nintendo (Only thing with a 6502 I can part with, it's broken). The instruction set is the same, and you get a few bonus built in features.
Quote:
-I wired VCC to 5v, and Grn to ground.
-I wired all the data bus pins to grn for a no-op instruction
-I wired all the data bus pins to grn for a no-op instruction
D0 - low
D1 - high
D2 - low
D3 - high
D4 - low
D5 - high
D6 - high
D7 - high
Quote:
-Wired VCC/Grnd to a ossilator, and wired the clock output, to the 6502's input.
Quote:
-I grounded NMI and IRQ, and put the first 4 address lines through leds.
Quote:
Reset is my biggest issue. I don't have a button on me right now, but would manually switching the wire between high, to low, back to high work?
Quote:
I tried doing this, but if RESET is 5v, all lines are active, and if grounded all lines are low.
Quote:
Just a note, the NES 6502 divides clockspeed by 12, so this may also be an issue, since I have a 5.37mhz oscillator, it's running at around 448khz.
x86? We ain't got no x86. We don't NEED no stinking x86!
-
GARTHWILSON

- Forum Moderator
- Posts: 8773
- Joined: 30 Aug 2002
- Location: Southern California
- Contact:
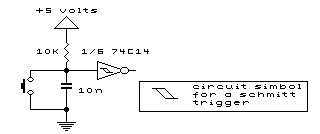
All good answers from BDD, but I think he's mostly thinking about the CMOS 6502. I don't think the NMOS one had a Schmitt-trigger input for RST\, so it needed a clean edge with a quick rise time. I can't find anything about it in the Rockwell or Synertek data sheets right now though. I do know that the NMOS ones had a die-heating problem with leaving the RST line down more than a tenth of a second or so. 50ms was what a lot of RST circuits were made to deliver. You will need more than just a switch, since the switch will produce a lot of bouncing instead of a clean RST signal. If the last low time is at least a few clock cycles long, you might be in luck, if the rise time is fast enough. Use a CMOS one and you won't have to worry about it.
The NMOS 6502 also required an external oscillator, unlike the CMOS one which could use an RC hung off the clock pins.
The NMOS 6502 was not guaranteed to work below 100kHz. The CMOS ones can be stopped without losing data from the registers, meaning you can even single-clock it with a button (with a debouncing circuit of course) so you can probe all the lines at each clock cycle if you want.
The NMOS 6502 had several bugs and quirks that got fixed in the CMOS one. The latter has more instructions and addressing modes too, so for anyone just starting out, I would definitely recommend going straight for the CMOS one. The exception is if someone wants to start programming on a Commodore 64 for example, since it used a 6502 variation that was never available in CMOS.
http://WilsonMinesCo.com/ lots of 6502 resources
The "second front page" is http://wilsonminesco.com/links.html .
What's an additional VIA among friends, anyhow?
The "second front page" is http://wilsonminesco.com/links.html .
What's an additional VIA among friends, anyhow?
Re: Beginner in digital circuitry
ioncannon wrote:
I began by desoldered a 6502 variant from the original Nintendo (Only thing with a 6502 I can part with, it's broken). The instruction set is the same, and you get a few bonus built in features.
Re: Beginner in digital circuitry
BigDumbDinosaur wrote:
ioncannon wrote:
Always wanted to do digital circuitry, and the current course I am taking in university has a lot to do with it (I am doing a CompSci major). I understand a lot of the hardware (if that's the right word) about microprocessors and various digital logic devices, but nothing about electrical engineering. However I would like to do some real world projects.
I began by desoldered a 6502 variant from the original Nintendo (Only thing with a 6502 I can part with, it's broken). The instruction set is the same, and you get a few bonus built in features.
I began by desoldered a 6502 variant from the original Nintendo (Only thing with a 6502 I can part with, it's broken). The instruction set is the same, and you get a few bonus built in features.
Quote:
-I wired VCC to 5v, and Grn to ground.
-I wired all the data bus pins to grn for a no-op instruction
-I wired all the data bus pins to grn for a no-op instruction
D0 - low
D1 - high
D2 - low
D3 - high
D4 - low
D5 - high
D6 - high
D7 - high
Quote:
-Wired VCC/Grnd to a ossilator, and wired the clock output, to the 6502's input.
Quote:
-I grounded NMI and IRQ, and put the first 4 address lines through leds.
Quote:
Reset is my biggest issue. I don't have a button on me right now, but would manually switching the wire between high, to low, back to high work?
Quote:
I tried doing this, but if RESET is 5v, all lines are active, and if grounded all lines are low.
Quote:
Just a note, the NES 6502 divides clockspeed by 12, so this may also be an issue, since I have a 5.37mhz oscillator, it's running at around 448khz.
GARTHWILSON wrote:
All good answers from BDD, but I think he's mostly thinking about the CMOS 6502. I don't think the NMOS one had a Schmitt-trigger input for RST\, so it needed a clean edge with a quick rise time. I can't find anything about it in the Rockwell or Synertek data sheets right now though. I do know that the NMOS ones had a die-heating problem with leaving the RST line down more than a tenth of a second or so. 50ms was what a lot of RST circuits were made to deliver. You will need more than just a switch, since the switch will produce a lot of bouncing instead of a clean RST signal. If the last low time is at least a few clock cycles long, you might be in luck, if the rise time is fast enough. Use a CMOS one and you won't have to worry about it.
The NMOS 6502 also required an external oscillator, unlike the CMOS one which could use an RC hung off the clock pins.
The NMOS 6502 was not guaranteed to work below 100kHz. The CMOS ones can be stopped without losing data from the registers, meaning you can even single-clock it with a button (with a debouncing circuit of course) so you can probe all the lines at each clock cycle if you want.
The NMOS 6502 had several bugs and quirks that got fixed in the CMOS one. The latter has more instructions and addressing modes too, so for anyone just starting out, I would definitely recommend going straight for the CMOS one. The exception is if someone wants to start programming on a Commodore 64 for example, since it used a 6502 variation that was never available in CMOS.
The NMOS 6502 also required an external oscillator, unlike the CMOS one which could use an RC hung off the clock pins.
The NMOS 6502 was not guaranteed to work below 100kHz. The CMOS ones can be stopped without losing data from the registers, meaning you can even single-clock it with a button (with a debouncing circuit of course) so you can probe all the lines at each clock cycle if you want.
The NMOS 6502 had several bugs and quirks that got fixed in the CMOS one. The latter has more instructions and addressing modes too, so for anyone just starting out, I would definitely recommend going straight for the CMOS one. The exception is if someone wants to start programming on a Commodore 64 for example, since it used a 6502 variation that was never available in CMOS.
Re: Beginner in digital circuitry
kc5tja wrote:
ioncannon wrote:
I began by desoldered a 6502 variant from the original Nintendo (Only thing with a 6502 I can part with, it's broken). The instruction set is the same, and you get a few bonus built in features.
-
GARTHWILSON
- Forum Moderator
- Posts: 8773
- Joined: 30 Aug 2002
- Location: Southern California
- Contact:
Quote:
Should 500khz clock be ok? I read it's due to DRAM data inside the CPU degrading if the chip is not clocked fast enough.
http://WilsonMinesCo.com/ lots of 6502 resources
The "second front page" is http://wilsonminesco.com/links.html .
What's an additional VIA among friends, anyhow?
The "second front page" is http://wilsonminesco.com/links.html .
What's an additional VIA among friends, anyhow?
Well, wired it correctly, and it still just outputs 1s on the address bus.
Got a 20mhz clock (So we are running at 1.6mhz)
Wired the Reset through this circuit to debounce http://www.all-electric.com/schematic/dbounce4.gif
Wired the data bus correctly
NMI and IRQ are wired to 5v
I am not too sure about resistors (again never did electric engineering), but maybe I need to use them instead of wires (in certain areas)?
Update: Put LEDs on the last 6 Address lines and I am seeing activity!!!! Seems it just just to fast to notice a change. However I popped a cable out by accident and now my reset is working backwords . Probably a cable to my not gate somewhere.
Update2: IT WORKS!!!! Problem was VCC fell out of a not gate. So cool seeing the leds count in binary. Big smile on my face.
Also means CPU isn't fried.
Now two things, for some reason the speed slows down after a while, and pressure on the cpu causes it to flicker/go fast again/pause. I am right now clocked around 450khz, maybe that's why? Going to put it back to 1.6mhz.
Update3:
Fixed the random flickering when cpu pressed, by placing the faster clock. Still have slow clock problems though.
Weird putting my hand even near (but not touching) the clock wire speeds up the clock (I AM GOD).
Have had it running for 10min now, CPU is really hot. How hot should they get normally?
Got a 20mhz clock (So we are running at 1.6mhz)
Wired the Reset through this circuit to debounce http://www.all-electric.com/schematic/dbounce4.gif
Wired the data bus correctly
NMI and IRQ are wired to 5v
I am not too sure about resistors (again never did electric engineering), but maybe I need to use them instead of wires (in certain areas)?
Update: Put LEDs on the last 6 Address lines and I am seeing activity!!!! Seems it just just to fast to notice a change. However I popped a cable out by accident and now my reset is working backwords
Update2: IT WORKS!!!! Problem was VCC fell out of a not gate. So cool seeing the leds count in binary. Big smile on my face.
Also means CPU isn't fried.
Now two things, for some reason the speed slows down after a while, and pressure on the cpu causes it to flicker/go fast again/pause. I am right now clocked around 450khz, maybe that's why? Going to put it back to 1.6mhz.
Update3:
Fixed the random flickering when cpu pressed, by placing the faster clock. Still have slow clock problems though.
Weird putting my hand even near (but not touching) the clock wire speeds up the clock (I AM GOD).
Have had it running for 10min now, CPU is really hot. How hot should they get normally?
-
BigDumbDinosaur
- Posts: 9425
- Joined: 28 May 2009
- Location: Midwestern USA (JB Pritzker’s dystopia)
- Contact:
ioncannon wrote:
Put LEDs on the last 6 Address lines and I am seeing activity!!!!
BTW, now that you seem to have some activity with your Frankenstein circuit, you should try to create a simple computer out of it. There is no shortage of examples around here, some that are very simple and some that aren't.
x86? We ain't got no x86. We don't NEED no stinking x86!
BigDumbDinosaur wrote:
ioncannon wrote:
Put LEDs on the last 6 Address lines and I am seeing activity!!!!
BTW, now that you seem to have some activity with your Frankenstein circuit, you should try to create a simple computer out of it. There is no shortage of examples around here, some that are very simple and some that aren't.
Was also thinking of turning it into a small NES synthesizer. Trying to understand the schematic (http://www.freeinfosociety.com/electron ... tendo4.jpg), prof. of mine says the two pins output to a filter of some kind.
I am guessing wiring a speaker to said pins won't work...
Update: Seems the lines are literally the direct output. Saw a few "stereo sound" guides, and people tap the two pins and feed wires to two RCA ports. Going to be an interesting project
-
BigDumbDinosaur
- Posts: 9425
- Joined: 28 May 2009
- Location: Midwestern USA (JB Pritzker’s dystopia)
- Contact:
ioncannon wrote:
Going to need a eprom programmer though =\. Expensive.
x86? We ain't got no x86. We don't NEED no stinking x86!
Hmm seems I may have done a little mistake. Was wiring the buses lines to a empty breadboard for better organization, and now the CPU seems to be dead. No output is coming from the address lines. The cpu isn't outputting anything. Do you think it's dead? Might have to go to value village and grab another NES lol.
Also, thanks Dino, got that eprom programmer you mentioned.
Also, thanks Dino, got that eprom programmer you mentioned.
Figured out, the clock line was messed up a bit. All works now. Got the address decoder circuit wired up and it's working correctly  !!!
!!!
Address Space is setup like this for now:
$0000-$1FFF ROM (8kb)
$2000-$3FFF RAM (8kb)
I am thinking of wiring a 7 segment display up to one address so I can output for now.
Now I have a question, on the NES CPU the RESET vector is at:
$FFFC–$FFFD 2 bytes Address of Power on reset handler routine
Will my ROM have to be positioned in that space? so instead of $2000-$3FFF it would be $E000-$FFFF? Is this the same on normal 6502's?

Yes, you pretty much need ROM at the top of memory to cover the vectors and RAM at the bottom to cover zero page and the stack.
If you do a partial address decode then either or both devices can be mirrored many times over. Perhaps ROM would cover everything from $8000 to $ffff and RAM cover everything from $0000 to $7fff. The advantage is that the address decode is simpler (or minimal) - there's not much difference to the software, if you're writing your own. But it might help fit in with the expectations of software you inherit.
(As an extreme case, the Atari 2600 had just 128bytes of RAM which was mirrored in both zero page and page one for the stack.)