6502.org Forum  Projects  Code  Documents  Tools  Forum
It is currently Sat May 04, 2024 3:56 am

All times are UTC


Post new topic Reply to topic  [ 14 posts ] 
Author Message
 Post subject: Latest project stream
PostPosted: Tue Jun 25, 2019 3:17 pm 
Offline
User avatar

Joined: Fri Dec 12, 2008 10:40 pm
Posts: 1000
Location: Canada
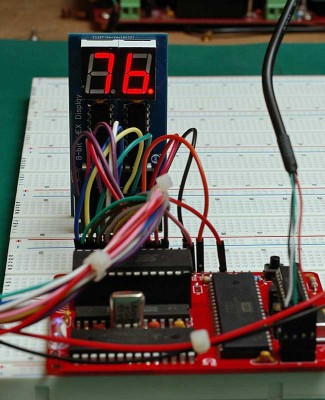
A couple of months back I wanted to create some little hex displays that plugged into a breadboard to use as monitors for data/address/etc. Kind of like mini 8-bit logic probes. In a previous thread on this site we had discussed 14495 hex to 7- segment latch/decoder/driver chips. I had a few lying around and decided to try them out. The first thing I stumbled across is they are painfully slow. They would not work in a 4MHz environment, let alone 14+ MHz. They may work at 1MHz, but I did not test this and frankly doubt they would given the specs at 5V. I ended up using them in transparent mode utilizing a 74AC574 between them and the CPU bus.

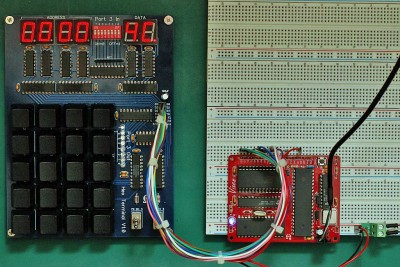
Here was the test set-up that finally worked (at 14Mhz)
Attachment:
IMGP9750.jpg
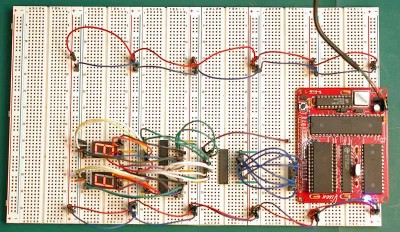
IMGP9750.jpg [ 128.16 KiB | Viewed 770 times ]


And the finished module:
Attachment:
HexDisp_1.jpg
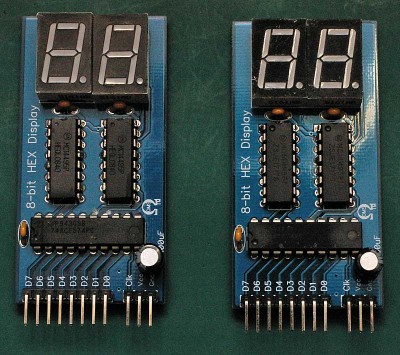
HexDisp_1.jpg [ 132.19 KiB | Viewed 770 times ]

Attachment:
HexDisp_3.jpg
HexDisp_3.jpg [ 88.74 KiB | Viewed 770 times ]


I also had a 74C923 hex keyboard decoder lying around and worked on putting a little hex keypad together to use for input for various and sundry projects, real and imagined. I also had trouble getting it to work at 14MHz on a 6502 bus and solved the problem by putting 74AC245 between it and the bus.

No picture of the development set-up, but here is a picture of the finished module:
Attachment:
HexKBD_1.jpg
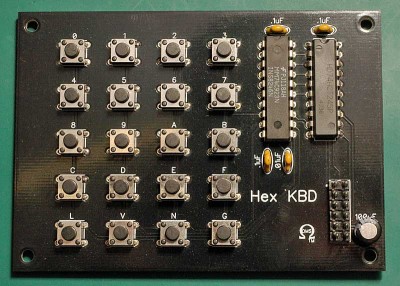
HexKBD_1.jpg [ 110.38 KiB | Viewed 770 times ]


I had such great fun playing with that key pad and 3 of the display modules using a port of a program I had once written for a Tandy Color computer in order to enter and modify machine language programs (a sort of ML monitor written in BASIC) that I thought it would be great to have a hex terminal that I could use for just such sort of shenanigans going forward. So I threw the key pad schematic together with 3 of the display schematics and added another 8-bit port for a configuration switch bank and a status display and through the miracle of modular design came up with this:
Attachment:
HexTerm_1.jpg
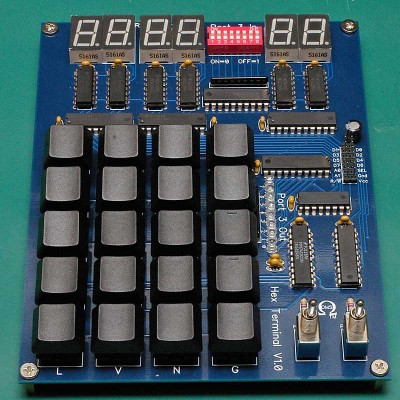
HexTerm_1.jpg [ 133.55 KiB | Viewed 770 times ]

Attachment:
HexTerm_2.jpg
HexTerm_2.jpg [ 134.49 KiB | Viewed 770 times ]
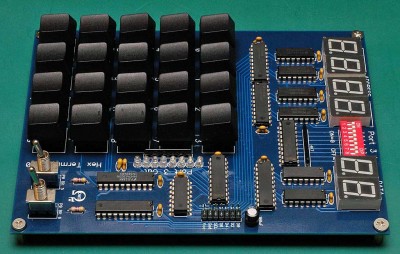
Attachment:
HexTerm_3.jpg
HexTerm_3.jpg [ 177.6 KiB | Viewed 770 times ]


It uses blue Cherry keys with the pins for direct PCB mounting (I nailed that pattern!) and some generic black keycaps. The two toggle switches on the lower right toggle bits 5 and 6 of the keyboard port to give a total of 44 function keys as well as the 16 hexadecimal codes. The whole thing is arranged as 4 I/O ports. Port 0 read is the keypad, port 0 write is the data display, port 1 write is the address low display, port 2 write is the address high display (no read on ports 1 and 2), and port 3 read is the dip switch bank and write is the LED bank.

I was amazed at the cost of these boards. Used gold immersion and they were still dirt cheap.

Now I've got the idea to combine the hex terminal with my Vixen SBC design and a couple of VIAs to create a 1970s type computer trainer ... like the KIM-1, except fast and with a usable amount of memory.

Anyone know how I could put relatively permanent symbols on my keycaps?

_________________
Bill


Top
 Profile  
Reply with quote  
PostPosted: Tue Jun 25, 2019 3:27 pm 
Offline

Joined: Wed Jan 08, 2014 3:31 pm
Posts: 574
Neat looking. I love the mechanical keypad as it reminds me of the microprocessor trainers from the early 80's.


Top
 Profile  
Reply with quote  
PostPosted: Tue Jun 25, 2019 3:55 pm 
Offline
User avatar

Joined: Thu Dec 11, 2008 1:28 pm
Posts: 10793
Location: England
20 keys and four plus two digits make for an excellent peripheral!


Top
 Profile  
Reply with quote  
PostPosted: Tue Jun 25, 2019 4:08 pm 
Offline
User avatar

Joined: Fri Dec 11, 2009 3:50 pm
Posts: 3350
Location: Ontario, Canada
Looks terrific, Bill! I'm particularly envious of your key switches and keycaps! 8) Indeed you did nail it.

Here's an idea. Perhaps there are others like me who have a KIM-1 with a worn out keypad. Maybe you could consider offering an external key-pad intended for KIM-1, or the pcb at least. IIRC the KIM-1 exposed the keypad row and column connections on its expansion connectors.

-- Jeff

ps: my own KIM-1 is retired, so I'm not a prospective customer. And: unfortunately no, I don't know of any good way to mark the key caps. :|

_________________
In 1988 my 65C02 got six new registers and 44 new full-speed instructions!
https://laughtonelectronics.com/Arcana/ ... mmary.html


Top
 Profile  
Reply with quote  
PostPosted: Tue Jun 25, 2019 5:12 pm 
Offline
User avatar

Joined: Wed Feb 14, 2018 2:33 pm
Posts: 1401
Location: Scotland
BillO wrote:
Anyone know how I could put relatively permanent symbols on my keycaps?


I used to use Letraset and a matt varnish spray... You can still get them, but it looks like a modern equivalent might be peel-off vinyl stickers which may be a bit more durable.

-Gordon

_________________
--
Gordon Henderson.
See my Ruby 6502 and 65816 SBC projects here: https://projects.drogon.net/ruby/


Top
 Profile  
Reply with quote  
PostPosted: Tue Jun 25, 2019 5:16 pm 
Offline
User avatar

Joined: Thu Dec 11, 2008 1:28 pm
Posts: 10793
Location: England
(In the world of remakes and repurposings of HP calculators, vinyl stickers seem to have a good reputation for keyboard overlays. The other tactic I've seen used to good effect is thin card over the tact switches: the card has enough flex to operate the keys and it's easy to print on card. Librarian tape can protect the printing.)


Top
 Profile  
Reply with quote  
PostPosted: Tue Jun 25, 2019 6:22 pm 
Offline
User avatar

Joined: Fri Aug 30, 2002 1:09 am
Posts: 8430
Location: Southern California
Very nice!

As for the nomenclature on the keys, here are some things you could consider:
https://www.micromark.com/Micromake-Com ... Making-Set
http://www.maxkeyboard.com/custom-art-i ... ycaps.html
https://xkeys.com/xkeys/accessories/cus ... gends.html
https://mechanicalkeyboards.com/shop/in ... ail&p=2247
https://datamancer.com/product/elementa ... r-keycaps/ (This one is almost a joke, but interesting.)
https://www.ebay.com/itm/1pc-White-Keyb ... 0037.m2107

_________________
http://WilsonMinesCo.com/ lots of 6502 resources
The "second front page" is http://wilsonminesco.com/links.html .
What's an additional VIA among friends, anyhow?


Top
 Profile  
Reply with quote  
PostPosted: Tue Jun 25, 2019 8:26 pm 
Offline
User avatar

Joined: Fri Dec 12, 2008 10:40 pm
Posts: 1000
Location: Canada
Thanks for the comments and the suggestions folks.

I like both the relegendable (is that even a word?) caps here: https://pimpmykeyboard.com/dsa-relegendables-pack-of-10/
and those 5x4 keypads you found, Garth. Both end up being expensive although either might be a consideration for the final computer. In the mean time I'm going to give these a try.

@Jeff - I like the idea of the KIM-1 keyboard. I have a SYM-1 here and it uses the same connector so I could test it with that.

_________________
Bill


Top
 Profile  
Reply with quote  
PostPosted: Tue Jun 25, 2019 8:38 pm 
Offline
User avatar

Joined: Fri Aug 30, 2002 1:09 am
Posts: 8430
Location: Southern California
The Grayhill series 87 keys are nice too, although they've gotten pretty expensive. They have clear covers you can put your own printed legends under, they're half inch square with pin size and spacing suitable for common perfboard with holes on .100" centers, and they're side-to-side and end-to-end stackable so you can make the keypad as big as you want. They're pretty flat and work nicely to make the top surface flush with the surface of a case. That's what I used in this tiny keypad:

Image

and this one for the automated test equipment I did at work in 1990, shown in my project pages on this site:
Image
(although obviously I did not make any effort to make the labels under the keys look professional on this one, which I probably should have done to match the transfer lettering I did on the panel).

_________________
http://WilsonMinesCo.com/ lots of 6502 resources
The "second front page" is http://wilsonminesco.com/links.html .
What's an additional VIA among friends, anyhow?


Top
 Profile  
Reply with quote  
PostPosted: Tue Jun 25, 2019 9:13 pm 
Offline
User avatar

Joined: Fri Dec 12, 2008 10:40 pm
Posts: 1000
Location: Canada
Dr Jefyll wrote:
8) Indeed you did nail it.

Thanks Jeff ... but what I really meant was I nailed the Cherry key switch pattern layout. I've used other designs made to take the PCB mount Cherry's before, but hose patterns did not work near as nice as the one I did (a little self-puffery here). When I put the key switches into the board they snapped in with a firm and solid 'SNAP' ... no movement at all.

However, that said, I messed up on the toggle switch pattern (now fixed). I ended up having to bend the leads to solder them in place (doh!).

But yeah, I like the overall layout too. It came out pretty much like I imagined.

_________________
Bill


Top
 Profile  
Reply with quote  
PostPosted: Tue Jun 25, 2019 9:20 pm 
Offline
User avatar

Joined: Fri Dec 12, 2008 10:40 pm
Posts: 1000
Location: Canada
GARTHWILSON wrote:
The Grayhill series 87 keys are nice too, although they've gotten pretty expensive.


I have to agree. I used them (or a similar Grayhill model) to build a few control consoles and various custom test equipment back when I worked in a film post-production studio. Money did not seem to be an object in those days.

There are nice things to be said for the Cherry key switched though. The full stroke, audible 'click' and pressure profile of the blue model are just peachy for this application. They just feel right and you know when you've made contact. The Grayhill are better for when your space is restricted though.

BTW, I like the Help button. We all need help when we have decisions like Up, Down, Yes or No to make!

_________________
Bill


Top
 Profile  
Reply with quote  
PostPosted: Tue Jun 25, 2019 10:34 pm 
Offline
User avatar

Joined: Mon May 12, 2014 6:18 pm
Posts: 365
If you were willing to go with white keys or painting the tops of your black keys white, you could try printing the legends in reverse on transparency film and gluing the printed side down. I have been experimenting with that for little calculator keys: link.


Top
 Profile  
Reply with quote  
PostPosted: Wed Jun 26, 2019 4:33 am 
Offline
User avatar

Joined: Thu Dec 11, 2008 1:28 pm
Posts: 10793
Location: England
This project by Cees Meijer to make a modern Jupiter ACE has 3D-printed keycaps over tact switches. The idea is to print in white, with recessed legend, paint black, then clean out the legend. It might work the other way too: print in black, paint white, then wipe off all the surface white paint leaving the legend painted white and the keycap black.

Attachment:
3d-keycaps.png
3d-keycaps.png [ 16.81 KiB | Viewed 704 times ]


This article suggests a custom silicone keypad to sit over the keys, and in the comments we see a link or two to the idea of 3D-printing moulds to cast your own silicone.


Top
 Profile  
Reply with quote  
PostPosted: Wed Jun 26, 2019 4:59 pm 
Offline

Joined: Mon May 21, 2018 8:09 pm
Posts: 1462
Custom pre-printed keys and key-sets are available commercially: http://www.wasdkeyboards.com/index.php/ ... p-set.html


Top
 Profile  
Reply with quote  
Display posts from previous:  Sort by  
Post new topic Reply to topic  [ 14 posts ] 

All times are UTC


Who is online

Users browsing this forum: No registered users and 8 guests


You cannot post new topics in this forum
You cannot reply to topics in this forum
You cannot edit your posts in this forum
You cannot delete your posts in this forum
You cannot post attachments in this forum

Search for:
Jump to: