6502.org Forum  Projects  Code  Documents  Tools  Forum
It is currently Sun Apr 28, 2024 12:08 am

All times are UTC


Post new topic Reply to topic  [ 35 posts ]  Go to page 1, 2, 3  Next
Author Message
 Post subject: REFLOW FOR DUMMIES
PostPosted: Sun Nov 08, 2015 1:30 am 
Offline
User avatar

Joined: Thu May 28, 2009 9:46 pm
Posts: 8147
Location: Midwestern USA
——————————————
REFLOW FOR DUMMIES
——————————————

I'm sure that anyone who had the dubious distinction of interacting with MS-DOS back in the day recalls the classic tome DOS for Dummies. The author, Dan Gookin, had suffered through the agony of figuring out what those DOS commands did and recorded his findings for posterity in what was a top-seller by computer book standards. The followup book, Windows for Dummies, in which Andy Rathbone suffered through similar aches and pains, is believed to be the best-selling computer instructional book of all times, with an estimated 15 million copies sold. Both of these publications went to the trouble to present technical material in a manner that would not intimidate a non-technical user, which had a lot to do with their sales successes.

Building on the DOS for Dummies premise—although few dummies inhabit 6502.org, I've started this topic on my experiences in attempting to reflow printed circuit boards (PCB) at home, using what I perceive to be readily available and inexpensive tools and supplies, as well as reasonably simple procedures. My ultimate goal is to be able to utilize fine pitch, surface mounted devices in my future designs, which holds the promise of more hardware on a smaller board, as well as access to programmable logic with a gazillion output pins. I'm a "dummy" when it comes to reflow, so I'm essentially working from scratch.

For the purpose of getting familiar with hobby reflowing, I'm going to build a copy of POC V1.1, which makes a good test base for this purpose. POC V1.1 is a functional design, which means if the finished assembly doesn't work or is unstable it'll likely be due to my reflow methods—the design itself won't be in question.

Here are the items that will be the victims of my first attempt at reflow:

Attachment:
File comment: POC V1.1 Printed Circuit Board
pcb.gif
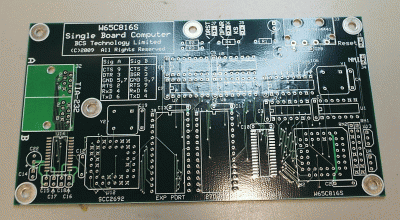
pcb.gif [ 1.32 MiB | Viewed 2074 times ]
Attachment:
File comment: Surface-Mount Devices
devices.gif
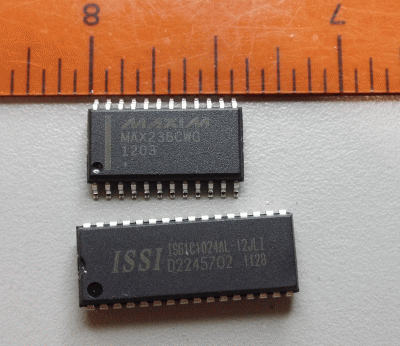
devices.gif [ 1.65 MiB | Viewed 2074 times ]

The devices are a MAX-238 in an SOIC-24 package and an ISSI 128KB SRAM in an SOJ32 package. The scale in the second photo is in inches.

THE REFLOW PROCESS

Before continuing, and for the benefit of those who aren't familiar with the reflow process and aren't inclined to wander around the Internet seeking information on it, I'll quickly explain. Reflowing involves heating the PCB and surface mount devices to a temperature sufficient to melt the solder (called "reflow") that is placed on the PCB's pads at the time of manufacture. The method by which the assembly is heated varies, however, a reflow oven is generally used for mass or short-run production purposes. A hot air pencil is often used for prototype/rework/repair purposes.

Reflow is either the traditional tin/lead alloy, usually 63/37, or an unleaded alloy to comply with RoHS standards. RoHS-compliant solders have a higher melting temperature than their leaded equivalents and probably should be avoided for hobby work. My experiences with repairing assemblies that are RoHS compliant have been mixed—"cold" solder joints tend to be a problem.

Immediately before the actual reflow process, a paste consisting of a mixture of solder particles and flux is applied to the pads to which devices are to be soldered. The parts are then placed on the PCB and the assembly is heated to begin the process. The assembly's temperature is elevated in steps so abrupt thermally-induced expansion doesn't occur to parts, which could be fatal to them. The pattern followed during heating is referred to as the "thermal profile."

When reflowing temperature is finally attained, the solder in the paste melts along with the reflow on the PCB, providing the necessary amount of solder to complete the joint. The assembly is kept at reflow temperature long enough to assure that the solder/reflow flows all around and under the pins on the parts being soldered to achieve a solid bond. The solder mask on the PCB helps to prevent flow from causing bridges between adjacent pads. Following reflow, the assembly is allowed to cool to well below reflow temperature before subsequent handling.

TOOLS & EQUIPMENT

In order to carry out the reflow process at home, you will need some stuff:

  • Chip Handlers

    Surface-mount devices are dinky compared to through-hole equivalents, which creates some challenges in handling them. Following the application of solder paste to your PCB, you need to accurately place your parts on the pads. For that task, tweezers and/or a suction pick are useful.

    Attachment:
    File comment: Suction Pick & Tweezers
    tools.gif
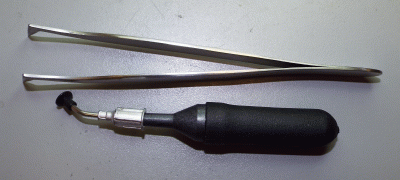
    tools.gif [ 2.34 MiB | Viewed 2074 times ]

    The suction pick, called a "Handi-Vac," is available from Edmund Optics. It comes with several attachments, which are basically little suction cups. After placing the suction cup on the device package, you squeeze and release the bulb to pick the part. Once the part is in place you again squeeze the bulb to release it. I found that wetting the suction cup immediately before picking a part improved the grip, giving me more time to handle the part before loss of suction.

    Attachment:
    File comment: Using Suction Pick
    chip_handling.gif
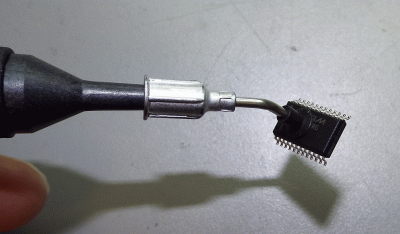
    chip_handling.gif [ 1.31 MiB | Viewed 2074 times ]

    In the above, I have picked the MAX-238. The grip was maintained for about 30 seconds, sufficient time to place the part if you aren't too clumsy. :D

    In lieu of a suction pick, a pair of eyebrow tweezers may be used for handling parts. They, of course, won't work well with larger packages. I found that handling an SOJ32 device with tweezers was awkward.

  • Source of Heat

    There are several means by which you can heat your PCB assembly for reflowing. Some hobbyists have had success with using an electric frying skillet. Others have used hot air guns and infrared lamps. I decided to use an actual oven, mostly due to the control that it offers. Whatever you do use, keep in mind that peak reflow temperature is around 450° F (232° C), which means your source of heat must be capable of attaining that temperature and maintaining it for at least 30-45 seconds. As will be seen when I get to the procedure for reflowing, the ability to accurately control temperature will be important.

    Attachment:
    File comment: Counter-Top Convection Oven
    reflow_oven.gif
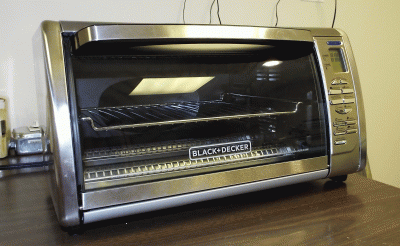
    reflow_oven.gif [ 1.97 MiB | Viewed 2074 times ]

    The above is a Black & Decker digital counter-top convection oven, model CT06335S. I spent some time researching suitable ovens before selecting this particular one, which replaces an old Proctor-Silex unit I had that suffered a heating element failure and proved to be too expensive to repair.

    Useful features of this unit are its infrared heating system, with elements located in both the unit's base and top, its convective capabilities, which produces a more even heating of the interior and contents, and a real-time temperature display, which is handy for monitoring the process. Although I have no plans to reflow one, an ATX motherboard will fit in this oven. I'm not advocating that you get this particular unit—any oven with similar features will be a good candidate for the job.

    A word of caution: an electric counter-top oven typically draws quite a bit of juice. This Black & Decker unit consumes 1500 watts when heating and not unexpectedly, radiates quite a bit of heat into the room. A 1500 watt oven generates about 5000 BTUs, which I found was enough to elevate the temperature in my shop several degrees after about 10 minutes of continuous operation.

Odors may develop during the reflow process, which will probably smell like roses to you, but probably something a little less pleasant to the other members of your family. :) Please keep all that in mind when you choose a location to set up your reflow facility.

In my next post, I'll go into prepping the PCB and placing the parts.

——————————————
EDIT: Fixed two typos.

_________________
x86?  We ain't got no x86.  We don't NEED no stinking x86!


Last edited by BigDumbDinosaur on Tue Nov 17, 2015 8:21 am, edited 3 times in total.

Top
 Profile  
Reply with quote  
 Post subject: Re: REFLOW FOR DUMMIES
PostPosted: Sun Nov 08, 2015 2:12 am 
Offline
User avatar

Joined: Fri Aug 30, 2002 1:09 am
Posts: 8428
Location: Southern California
A co-worker found this company for very inexpensive solderpaste stencils: https://www.pololu.com/product/446 . He had a stencil made to hand-assemble the first article of a board I laid out, and seemed to get good results.

_________________
http://WilsonMinesCo.com/ lots of 6502 resources
The "second front page" is http://wilsonminesco.com/links.html .
What's an additional VIA among friends, anyhow?


Top
 Profile  
Reply with quote  
 Post subject: Re: REFLOW FOR DUMMIES
PostPosted: Sun Nov 08, 2015 3:28 am 
Offline
User avatar

Joined: Thu May 28, 2009 9:46 pm
Posts: 8147
Location: Midwestern USA
GARTHWILSON wrote:
A co-worker found this company for very inexpensive solderpaste stencils: https://www.pololu.com/product/446 . He had a stencil made to hand-assemble the first article of a board I laid out, and seemed to get good results.

I've looked at their products in the past. Typically, a stencil isn't required with 50 mil parts if you have reasonably steady hands. I wouldn't say that a stencil is indispensable with smaller pitch parts, but it could save you some grief.

Incidentally, mention is made of a tutorial at Sparkfun about using a stencil to apply solder paste. That tutorial is somewhat out of date and at least for the beginner, probably should be ignored. In particular, small quantities of solder paste are available that don't require overnight delivery. I ordered this MG Chemicals product, which has a 12 month shelf life if refrigerated and a six month shelf life at room temperature (25° C maximum). It shipped via UPS ground, along with other items in my order.

_________________
x86?  We ain't got no x86.  We don't NEED no stinking x86!


Top
 Profile  
Reply with quote  
 Post subject: Re: REFLOW FOR DUMMIES
PostPosted: Sun Nov 08, 2015 7:01 am 
Offline
User avatar

Joined: Tue Nov 16, 2010 8:00 am
Posts: 2353
Location: Gouda, The Netherlands
I started with a similar hand held vacuum pick up tool, but after a while I replaced it with an electric one that I modified to work with a foot-operated switch. The advantages are that the vacuum is held as long as I need it, and that it doesn't require any hand/finger movement to release, making it easier to keep it still. Looks like ebay sells electric pump for less than $20. These are basically aquarium bubble pumps, but with a real inlet port.


Top
 Profile  
Reply with quote  
 Post subject: Re: REFLOW FOR DUMMIES
PostPosted: Sun Nov 08, 2015 7:19 am 
Offline
User avatar

Joined: Thu May 28, 2009 9:46 pm
Posts: 8147
Location: Midwestern USA
Arlet wrote:
I started with a similar hand held vacuum pick up tool, but after a while I replaced it with an electric one that I modified to work with a foot-operated switch. The advantages are that the vacuum is held as long as I need it, and that it doesn't require any hand/finger movement to release, making it easier to keep it still. Looks like ebay sells electric pump for less than $20. These are basically aquarium bubble pumps, but with a real inlet port.

If assembly of SMT parts was going to be a regular activity for me I'd get an electric pump. That said, recall that one of my objectives in my original post is to present a process that is "...using what I perceive to be readily available and inexpensive tools and supplies..." :)

_________________
x86?  We ain't got no x86.  We don't NEED no stinking x86!


Top
 Profile  
Reply with quote  
 Post subject: Re: REFLOW FOR DUMMIES
PostPosted: Sun Nov 08, 2015 8:24 am 
Offline
User avatar

Joined: Tue Nov 16, 2010 8:00 am
Posts: 2353
Location: Gouda, The Netherlands
$20 for an electric pump on Ebay, or maybe less if you can modify an old aquarium bubbler, could be considered readily available and inexpensive, certainly when compared to the oven, PCB/components, solder paste, and possibly the stencils. And my first foot operated switch was just an extension cord with a toggle switch that I had lying around.

Here are a few photos I took when I was assembling some boards using reflow oven: http://imgur.com/a/ZyfmB

One of my tricks to get a nice crisp impression out of the stencil is to ignore the manufacturer's advice to use room temperature paste, and stir it well. I do exactly the opposite: straight out of the refrigerator, and minimal stirring. The more you handle the paste, the thinner it gets, and the easier it spreads to neighbour pads, possibly causing bridges. I only stir it after purchasing, or after long periods of not using it. But then it first goes back in the fridge for a night before use.

Of course, if you apply the paste by hand out of syringe, warming is probably necessary to get it through the thin nozzle.


Top
 Profile  
Reply with quote  
 Post subject: Re: REFLOW FOR DUMMIES
PostPosted: Sun Nov 08, 2015 4:01 pm 
Offline

Joined: Wed Sep 23, 2015 8:14 pm
Posts: 171
Location: Philadelphia, PA
Thanks for taking the time to document your experiences, BDD. I'm no fan of soldering or mechanical assembly in general, but sometimes they are necessary evils so I will follow your travails with the same interest a squeamish person in medical school would observe a human dissection by the professor. :)


Top
 Profile  
Reply with quote  
 Post subject: Re: REFLOW FOR DUMMIES
PostPosted: Sun Nov 08, 2015 5:40 pm 
Offline
User avatar

Joined: Mon May 25, 2015 2:25 pm
Posts: 632
Location: Gillies, Ontario, Canada
Thanks, this is going to be a great tutorial, I have a few boards to try this out on.
I will soon be hijacking our toaster oven, no doubt!

Brad


Top
 Profile  
Reply with quote  
 Post subject: Re: REFLOW FOR DUMMIES
PostPosted: Sun Nov 08, 2015 6:10 pm 
Offline
User avatar

Joined: Tue Nov 16, 2010 8:00 am
Posts: 2353
Location: Gouda, The Netherlands
Quote:
I will soon be hijacking our toaster oven, no doubt!

If you do that, I wouldn't use it for food preparation later. The chemicals released by the solder paste aren't exactly healthy.


Top
 Profile  
Reply with quote  
 Post subject: Re: REFLOW FOR DUMMIES
PostPosted: Sun Nov 08, 2015 6:16 pm 
Offline
User avatar

Joined: Mon May 25, 2015 2:25 pm
Posts: 632
Location: Gillies, Ontario, Canada
But on the flip side, my next project will exude a subtle smell of pizza!

Arlet wrote:
Quote:
I will soon be hijacking our toaster oven, no doubt!

If you do that, I wouldn't use it for food preparation later. The chemicals released by the solder paste aren't exactly healthy.


Top
 Profile  
Reply with quote  
 Post subject: Re: REFLOW FOR DUMMIES
PostPosted: Wed Nov 11, 2015 9:36 pm 
Offline

Joined: Mon Jan 07, 2013 2:42 pm
Posts: 576
Location: Just outside Berlin, Germany
As long as it isn't the smell of broccoli, we're good. -- Seriously, thanks for this thread. I'm really looking forward to it.


Top
 Profile  
Reply with quote  
 Post subject: Re: REFLOW FOR DUMMIES
PostPosted: Thu Nov 12, 2015 6:32 am 
Offline
User avatar

Joined: Thu May 28, 2009 9:46 pm
Posts: 8147
Location: Midwestern USA
I'm a little behind the eight ball here. A sudden burst of real work has kept me away from my toys. :cry:

_________________
x86?  We ain't got no x86.  We don't NEED no stinking x86!


Top
 Profile  
Reply with quote  
 Post subject: Re: REFLOW FOR DUMMIES
PostPosted: Tue Nov 17, 2015 8:29 am 
Offline
User avatar

Joined: Thu May 28, 2009 9:46 pm
Posts: 8147
Location: Midwestern USA
Okay, my first attempt at reflowing is complete. As soon as I can organize my thoughts and pictures I'll post the results.

_________________
x86?  We ain't got no x86.  We don't NEED no stinking x86!


Top
 Profile  
Reply with quote  
PostPosted: Thu Nov 19, 2015 9:16 pm 
Offline
User avatar

Joined: Thu May 28, 2009 9:46 pm
Posts: 8147
Location: Midwestern USA
——————————————
REFLOW FOR DUMMIES
——————————————

Continuing from my earlier posts, I prepped my PCB and submitted it to my "reflow oven" (aka toaster-oven) for processing. Temperature references in the text will be Fahrenheit. Pictures will be spread out over several posts.

Attachment:
File comment: Syringe w/Solder Paste
solder_paste.gif
solder_paste.gif [ 1.19 MiB | Viewed 1879 times ]

Above is the syringe of solder paste ready for use. As can be seen, this paste is an MG Chemicals product, which is shipped with an applicator nozzle and plunger. It is a leaded paste, comprising of 63 percent tin and 37 percent lead, in a water base. Solder paste should be store in refrigeration, but is somewhat difficult to work with at such temperatures. MG Chemicals recommends that the solder paste be kept at room temperature a minimum of three hours before use. That wasn't quite enough time to get it to a workable state, so I let it sit for about four hours before application.

Note that as this is a leaded paste it is wise to avoid epidermal contact with it, as lead can be absorbed though the skin and cause subsequent health problems. I kept some isopropanol and paper towels handy for cleanup if needed. Some fumes will result when the paste is heated to reflow temperature, which demands that you adequately ventilate the room in which you are working.

Attachment:
File comment: Solder Paste on SOIC-24 Pads
sp_on_soic24.gif
sp_on_soic24.gif [ 5.43 MiB | Viewed 1879 times ]

Above is solder paste applied to the pads where the MAX-238 SOIC-24 package is to be soldered. It turned out to be more than necessary. I'll come back to the application process later on.

Attachment:
File comment: Solder Paste on SOJ-32 Pads
sp_on_soj32.gif
sp_on_soj32.gif [ 3.58 MiB | Viewed 1879 times ]

Above is solder paste applied to the pads where the SRAM SOJ-32 package is to be soldered. It also turned out to be more than necessary.

Attachment:
File comment: MAX-238 in Place
max238_before.gif
max238_before.gif [ 4.27 MiB | Viewed 1879 times ]
Attachment:
File comment: SRAM in Place
sram_before.gif
sram_before.gif [ 3.59 MiB | Viewed 1879 times ]

Above are the two devices in position. I couldn't see it at the time, but some of the solder paste has squished out in between the pads, which was not good.

More pictures follow...

_________________
x86?  We ain't got no x86.  We don't NEED no stinking x86!


Last edited by BigDumbDinosaur on Thu Nov 19, 2015 10:51 pm, edited 1 time in total.

Top
 Profile  
Reply with quote  
PostPosted: Thu Nov 19, 2015 10:47 pm 
Offline
User avatar

Joined: Thu May 28, 2009 9:46 pm
Posts: 8147
Location: Midwestern USA
——————————————
REFLOW FOR DUMMIES
——————————————

Continuing from the previous post...

Attachment:
File comment: Into the Oven
into_the_oven.gif
into_the_oven.gif [ 6.21 MiB | Viewed 1873 times ]

Here is the board ready to go into the oven. Needless to say, handling the board carefully is essential so the chips don't move out of position.

Attachment:
File comment: Typical Thermal Profile
thermal_profile.gif
thermal_profile.gif [ 40.39 KiB | Viewed 1873 times ]

Once the board was in the oven it was time to bake it and see what would happen, following a thermal profile that is relatively common in the industry. A goal of the thermal profile is to evenly heat everything in a way that won't subject devices to undue thermal shock. The PCB itself isn't particularly vulnerable to damage from thermal shock, but devices are and can end up DOA if heated too rapidly or for too long. So after doing some reading on others' efforts at homebrew reflow, I decided to try a four phase process, viz.:

  • Soak phase. After initial preheat, the oven was held at 200 degrees for four minutes. Soaking assures that all parts have expanded equally, reducing the chance of thermally-induced fracture of an internal connection in a device.

    Attachment:
    File comment: Timing the Phases
    timer.gif
    timer.gif [ 3.99 MiB | Viewed 1873 times ]

    Phases were timed with a kitchen timer—which makes perfect sense, given that the "reflow oven" is a kitchen appliance and the solder paste was stored in the refrigerator, also a kitchen appliance. :lol: As an aside, my EPROM erasing rig was concocted from what started out as a light fixture intended for mounting under a kitchen cabinet. :shock:

  • Saturation phase. Following the soak phase, the oven temperature was elevated to 325 degrees and kept at that level for two minutes. Saturation brings the temperature of everything up to just below where the solder paste and reflow on the PCB start to liquify. Again, the object was to avoid thermally-induced damage.

  • Reflow phase. Following the saturation phase, the oven temperature was increased to 450 degrees and kept at that level for 30 seconds. Liquification commenced at about 390 degrees and was essentially complete at 420 degrees. At that temperature the paste was bubbling and doing its thing.

    Attachment:
    File comment: Oven at 450 Degrees
    reflow_at_450.gif
    reflow_at_450.gif [ 3.35 MiB | Viewed 1873 times ]
    Attachment:
    File comment: MAX-238 Reflowing
    max238_reflowing.gif
    max238_reflowing.gif [ 2.16 MiB | Viewed 1873 times ]

    In the above picture, reflowing is occurring on the MAX-238's pins and it is patent that there is too much solder paste. Getting a good picture through the oven's glass door proved to be difficult, as the camera was having a hard time focusing. So the picture isn't as clear as I would have liked.

  • Cooling phase. Following the reflow phase, I shut off the oven and carefully opened the door. I allowed the board to sit for about five minutes before removing it from the oven for inspection.

Inspection pictures and my assessment of the experiment will be in the next post.

_________________
x86?  We ain't got no x86.  We don't NEED no stinking x86!


Top
 Profile  
Reply with quote  
Display posts from previous:  Sort by  
Post new topic Reply to topic  [ 35 posts ]  Go to page 1, 2, 3  Next

All times are UTC


Who is online

Users browsing this forum: No registered users and 34 guests


You cannot post new topics in this forum
You cannot reply to topics in this forum
You cannot edit your posts in this forum
You cannot delete your posts in this forum
You cannot post attachments in this forum

Search for:
Jump to: