6502.org Forum  Projects  Code  Documents  Tools  Forum
It is currently Mon Apr 29, 2024 1:29 pm

All times are UTC


Post new topic Reply to topic  [ 155 posts ]  Go to page 1, 2, 3, 4, 5 ... 11  Next
Author Message
PostPosted: Tue Sep 18, 2012 10:03 pm 
Offline

Joined: Mon Mar 02, 2009 7:27 pm
Posts: 3258
Location: NC, USA
PVB = 16-bit Parallel Video Board. The Concept and Design thread is mentioned here. Currently, as of 9/18/2012, in that thread I have soldered all parts except the expensive 6.5ns pass-thru Synchronous RAM and hi-frequency bypass capacitors. Some of the larger power supply bypass cap's have been soldered already.

After first power-up, Xilinx ISE 13.4 had successfully seen and programmed 2 selectable FPGA PROMs and the Spartan 6 FPGA itself. I've skipped the hi-frequency bypass cap's because I wish to observe at which point the board fails or the video output becomes noisy. This observation may be at the very beginning of this test, i.e. where a successful video output is generated...

So, I am in need of this real world test to validate my design and before I ask our resident Verilog experts for help, I would like to turn to a Verilog pong project at www.FPGA4FUN.com. It has a very simple video generator that outputs a checkerboard pattern at a resolution of 640x480. The HSYNC and VSYNC part of the code should be OK. However, since I use a videoDAC using 16-bits 5-6-5 RGB and the code was made for 3-bit color using a resistor ladder and signals output from a Spartan 3, it will need a simple modification. Hopefully simple, I will work on this tomorrow...

Once this Test is complete, I'll store the design in the 1st FPGA PROM. Then I'll slightly modify it further, possibly to a different resolution, and store that design in the 2nd FPGA PROM. Once the programmable FPGA PROM selection is verified by jumper and external control pin through the main connector, I will go on to solder-in the SyncRAM. At this point I will surely need help.

It is anticipated that this thread should come to a close at the end of a successful display of 2 simple Video Generator Test 'projects' stored on each of the PROMs, using read-only data from the SyncRAM at a maximum resolution. After this, the real fun begins!

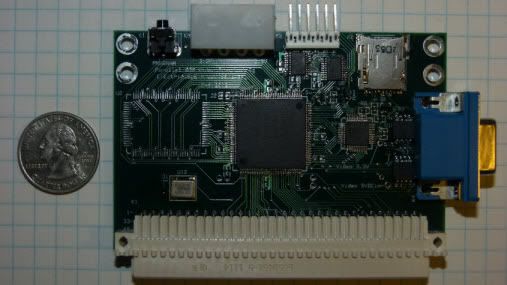
This is the topside of the PVB v1.0g showing the current hardware, true life size if displayed on a 15" 1024x768 monitor. The U.S. quarter is the size 'check', slightly stretched in the horizontal plane due to 16x9 camera settings. I measure that quarter diameter@ 24.11mm with a digital micrometer:
Image

_________________
65Org16:https://github.com/ElEctric-EyE/verilog-6502


Last edited by ElEctric_EyE on Sun Sep 30, 2012 11:44 pm, edited 1 time in total.

Top
 Profile  
Reply with quote  
PostPosted: Wed Sep 19, 2012 4:42 pm 
Offline

Joined: Mon Mar 02, 2009 7:27 pm
Posts: 3258
Location: NC, USA
After correcting 1 slight setback due to an error on the layout, I have good HSYNCout, VSYNCout, and PCLKout signals present. I am using a simple divider to get 25MHz, and a DDR flip-flop to get it off the S6, from the 100MHz MAINCLK1 input. I'm seeing a HSYNC frequency of about 32kHz, and VSYNC around 63Hz.

I am using the constraints file from here, with all unused signals commented out. Thanks to Jean P. Nicolle for sharing his code on the FPGA4FUN website. Unfortunately, I am still using a top_level schematic to join the HDL together because it's the only way I know how to do it.
Here is his code:
Code:
module hvsync_generator(clk, vga_h_sync, vga_v_sync, inDisplayArea, CounterX, CounterY);
input clk;
output vga_h_sync, vga_v_sync;
output inDisplayArea;
output [9:0] CounterX;
output [8:0] CounterY;

//////////////////////////////////////////////////
reg [9:0] CounterX;
reg [8:0] CounterY;
wire CounterXmaxed = (CounterX==10'h2FF);

always @(posedge clk)
if(CounterXmaxed)
   CounterX <= 0;
else
   CounterX <= CounterX + 1;

always @(posedge clk)
if(CounterXmaxed) CounterY <= CounterY + 1;

reg   vga_HS, vga_VS;
always @(posedge clk)
begin
   vga_HS <= (CounterX[9:4]==6'h2D); // change this value to move the display horizontally
   vga_VS <= (CounterY==500); // change this value to move the display vertically
end

reg inDisplayArea;
always @(posedge clk)
if(inDisplayArea==0)
   inDisplayArea <= (CounterXmaxed) && (CounterY<480);
else
   inDisplayArea <= !(CounterX==639);
   
assign vga_h_sync = ~vga_HS;
assign vga_v_sync = ~vga_VS;

endmodule


Progress continues...

_________________
65Org16:https://github.com/ElEctric-EyE/verilog-6502


Top
 Profile  
Reply with quote  
PostPosted: Wed Sep 19, 2012 10:10 pm 
Offline
User avatar

Joined: Mon Apr 23, 2012 12:28 am
Posts: 760
Location: Huntsville, AL
For VGA timing and format at 25 MHz, I compute a horizontal line length of 794 or 793 pixels with an active area of 640 pixels, and the number of vertical lines at 525. These parameters will yield a better 4:3 aspect ratio "square" pixel than the values I extracted from the posted Verilog: 768 h x 512 v. Perhaps Arlet can comment on the appropriate settings as he seems to be more in tune with the NTSC/PAL/VGA parameters than I am; haven't worked video generation in 15+ years.

_________________
Michael A.


Top
 Profile  
Reply with quote  
PostPosted: Thu Sep 20, 2012 4:51 pm 
Offline

Joined: Mon Mar 02, 2009 7:27 pm
Posts: 3258
Location: NC, USA
MichaelM wrote:
For VGA timing and format at 25 MHz, I compute a horizontal line length of 794 or 793 pixels with an active area of 640 pixels, and the number of vertical lines at 525...

Quoting from the FPGA4FUN wesite:
Quote:
Using a 25MHz clock, we get 32.5KHz for HS and 63.5Hz for VS. The pulses need to be active long enough for the monitor to detect them. Let's use a 16 clocks pulse (0.64µs) for HS and a full horizontal line length pulse for VS (768 clocks or 30µs). That's shorter than what the VGA spec calls for but works fine anyway.

_________________
65Org16:https://github.com/ElEctric-EyE/verilog-6502


Top
 Profile  
Reply with quote  
PostPosted: Thu Sep 20, 2012 4:54 pm 
Offline

Joined: Mon Mar 02, 2009 7:27 pm
Posts: 3258
Location: NC, USA
I was looking over the code, and I decided to tighten it up abit. Is the following functionally the same as the original? I'm at work, so I am unable to test it out yet.
Code:
module hvsync_generator(
                        input clk,
                        output vga_h_sync,
                        output vga_v_sync,
                        output reg inDisplayArea,
                        output reg [9:0] CounterX,
                        output reg [8:0] CounterY
                        );

//////////////////////////////////////////////////
wire CounterXmaxed = (CounterX==10'h2FF);

always @(posedge clk)
if(CounterXmaxed)
   CounterX <= 0;
else
   CounterX <= CounterX + 1;

always @(posedge clk)
if(CounterXmaxed) CounterY <= CounterY + 1;

reg vga_HS, vga_VS;
always @(posedge clk)
begin
   vga_HS <= (CounterX[9:4]==6'h2D); // change this value to move the display horizontally
   vga_VS <= (CounterY==500); // change this value to move the display vertically
end

//reg inDisplayArea;
always @(posedge clk)
if(inDisplayArea==0)
   inDisplayArea <= (CounterXmaxed) && (CounterY<480);
else
   inDisplayArea <= !(CounterX==639);
   
assign vga_h_sync = ~vga_HS;
assign vga_v_sync = ~vga_VS;

endmodule


_________________
65Org16:https://github.com/ElEctric-EyE/verilog-6502


Top
 Profile  
Reply with quote  
PostPosted: Thu Sep 20, 2012 5:06 pm 
Offline
User avatar

Joined: Mon Apr 23, 2012 12:28 am
Posts: 760
Location: Huntsville, AL
It appears to be a match. The Verilog 2001 module port list format is much better in my opinion; it certainly is less wordy.

The issue is not the FPGA4Fun format, but the character of the display. At the generally accepted rate of 25.175 MHz, the format is 800 h x 525 v. This is a square pixel format so circles appear as expected instead as slightly oval. The timing parameters embedded in the VS/HS module you are working with lead me to expect a slightly squashed circle in the horizontal domain because variance in the number of pixels in that dimensions is greater than the variance in the vertical dimension. But this is just speculation on my part at this time, since the proof will be in the appearance of a circle on the screen, and you are not at that point yet.

_________________
Michael A.


Top
 Profile  
Reply with quote  
PostPosted: Thu Sep 20, 2012 5:49 pm 
Offline
User avatar

Joined: Tue Nov 16, 2010 8:00 am
Posts: 2353
Location: Gouda, The Netherlands
Here is a site with VGA timings, including the one for 640x480 @ 60Hz. It uses 800x525 for the whole screen, with a 640x480 visible area.

And here's my own VGA timing generator. It assumes a 50 MHz input clock, and generates a 25 MHz pixel clock. Since the pixel clock is registered, you don't need a DDR flop. Just assign it to an output pin.


Top
 Profile  
Reply with quote  
PostPosted: Thu Sep 20, 2012 7:03 pm 
Offline

Joined: Mon Mar 02, 2009 7:27 pm
Posts: 3258
Location: NC, USA
Excellent, that will do nicely, thanks! I think I can write some simple code using the output signals that module provides to generate a pattern from counters run off the pixel clock feeding the RGB DACs.

_________________
65Org16:https://github.com/ElEctric-EyE/verilog-6502


Top
 Profile  
Reply with quote  
PostPosted: Fri Sep 21, 2012 1:34 pm 
Offline

Joined: Mon Mar 02, 2009 7:27 pm
Posts: 3258
Location: NC, USA
Since Reset is not used, what would be a good testbench to use to see it run in ISim?

_________________
65Org16:https://github.com/ElEctric-EyE/verilog-6502


Top
 Profile  
Reply with quote  
PostPosted: Fri Sep 21, 2012 2:55 pm 
Offline
User avatar

Joined: Mon Apr 23, 2012 12:28 am
Posts: 760
Location: Huntsville, AL
It can be done, but it's more effort than adding the reset input. I know it goes against the grain, and while I was using schematic entry and not performing simulation prior to implementing my circuits directly in the FPGA, I too was in this camp. But as the designs get bigger, the approach of testing in the FPGA just runs out of steam.

Either FPGA4Fun or Arlet's code can easily be modified to include the reset, and if you do, then a testbench for either is very simple. You can find an example of such a testbench in my GitHub repositories. Look at the testbench for the MAM65C02 RAM module: tb_M65C02_RAM.v. It simply consists of setting up the reset signal, a delay to turn off the reset signal, and a clock generator.

Most of the testbench is constructed by the ISE testbench wizard. I edit the default states of the input signals at the beginning of the initial block (particularly so that the reset signal is asserted and the clock phase is set as applicable), then I turn off the reset signal (after at least 100 ns; ISim requirement). Following the initial block, I always define the clock in the manner shown. An example of this style of clock generation is given in the light bulb (help) tool. In the case of the referenced testbench, I then set up a counter to run through all of the addresses so that I could check that the 65C02 test program was being loaded. In a later testbench, the same module is used, and the RAM write function is used, and thereby tested.

BTW, I hardly ever try to set up the clock periods to match the actual clocks. I simply set it up, as shown in the referenced testbench, at 10 ns. It's a just a functional simulation, and what you are looking for is the counters to be counting, terminal counts occurring as expected, etc.

_________________
Michael A.


Top
 Profile  
Reply with quote  
PostPosted: Fri Sep 21, 2012 3:22 pm 
Offline

Joined: Mon Mar 02, 2009 7:27 pm
Posts: 3258
Location: NC, USA
I was not aware there was a testbench wizard, I'll check it out. I thought about finishing adding a reset to Arlet's code. It is present as an input signal but is never used.

In the past when doing simulations on a circuit with a reset within ISim, I don't even use a testbench. I right click on reset and force it active for a very short period of time, then right click on the main clock and set those parameters and it's ready for simulation.

_________________
65Org16:https://github.com/ElEctric-EyE/verilog-6502


Top
 Profile  
Reply with quote  
PostPosted: Fri Sep 21, 2012 3:31 pm 
Offline
User avatar

Joined: Tue Nov 16, 2010 8:00 am
Posts: 2353
Location: Gouda, The Netherlands
You could also remove the reset signal, or just leave it unconnected.


Top
 Profile  
Reply with quote  
PostPosted: Fri Sep 21, 2012 4:20 pm 
Offline
User avatar

Joined: Mon Apr 23, 2012 12:28 am
Posts: 760
Location: Huntsville, AL
In case you've not found it yet:

Under Project, select the Add New Source option.
This pops up a wizard.
In the wizard, select Verilog Test Fixture, and provide a name for the testbench.

I generally name my testbenches tb_MODULE_TO_BE_TESTED. The wizard supports my convention pretty well, but at times it is unable to find the module to be tested on its own. In those circumstances, it presents a list of files that you can select as the UUT, unit under test. In general, the wizard works well with the order reversed: MODULE_TO_BE_TESTED_tb.

The wizard then pulls in the specified module's port list and creates an instantiation of the module in an automatically generated file. It groups the inputs together and declares registers for them, and then groups together the outputs and declares wires for them. It creates an initial block and initializes all of the inputs to 0.

At this point, you have to go in and edit the generated testbench to include your required initializations, clocks, and other test structures. I generally just set up the inputs, set up the reset pulse, and the clocks, and then run ISim on the testbench at this point. This allows me to see that I've got the inputs declared correctly. If ISim brings up the simulation as expected at this point, then I go in and started generating tests, adding functions, tasks, or synthezable test blocks as shown in the referenced testbench.

I just prefer to keep my Verilog modules separated from their testbenches. Having the _tb at the end places the files together lexically. Further, if I recall correctly, there is a practical limit of 32 characters to the filename.

Hope this helps.

_________________
Michael A.


Top
 Profile  
Reply with quote  
PostPosted: Fri Sep 21, 2012 4:51 pm 
Offline
User avatar

Joined: Mon Apr 23, 2012 12:28 am
Posts: 760
Location: Huntsville, AL
Followed the procedure I gave in the previous post with Arlet's vga.v. After setting up an always #10 clk50 = ~clk50; clock generator after the initial block, the ISim simulation of his code runs just fine.

Arlet's coding style/technique use the initialization style supported by Verilog for all of the major elements of the module. This provides the initial conditions that the simulator requires. However, be aware that the initialization that is performed using this technique is only applicable on configuration of the FPGA. IOW, it's embedded in the bitstream as the initial reset conditions of the FFs.

If your expectation is to configure the FPGA on power up, and never attempt to restart the module, then this technique is appropriate. However, if the module requires a restart, then it will require a reset signal. When a user defined module reset is required, initialization should be provided within the body of the code. The synthesis results are the same. That is, the initialization values of the FF are built into the FPGA CLBs and are not implemented with additional logic. The FF/CLB contains built-in initialization elements that are determined by the configuration bit stream, and which determine whether the FF initializes on reset to a 1 or a 0. If no initialization value is specified, then a value of 0 is assumed, but an initialization value can be specified for each FF and that desired value is captured in the configuration of the FF contained in the bitstream.

During configuration, the FPGA configuration engine drives an internal signal that holds all the FFs in reset. You can control when that signal is released relative to the deassertion of DONE, but the user cannot reactivate it easily from within the FPGA. Therefore, if you need to reinitialize a module, then it needs a reset signal that is driven by user defined logic.

_________________
Michael A.


Top
 Profile  
Reply with quote  
PostPosted: Fri Sep 21, 2012 6:22 pm 
Offline

Joined: Mon Mar 02, 2009 7:27 pm
Posts: 3258
Location: NC, USA
Excellent, I got it working with the always #10 clk50 = ~clk50. Thanks for the help. Now I can go on to develop my simple pattern generator during slow work days and test it before heading home to program the FPGA. Should have something in a couple days...

_________________
65Org16:https://github.com/ElEctric-EyE/verilog-6502


Top
 Profile  
Reply with quote  
Display posts from previous:  Sort by  
Post new topic Reply to topic  [ 155 posts ]  Go to page 1, 2, 3, 4, 5 ... 11  Next

All times are UTC


Who is online

Users browsing this forum: Google [Bot] and 14 guests


You cannot post new topics in this forum
You cannot reply to topics in this forum
You cannot edit your posts in this forum
You cannot delete your posts in this forum
You cannot post attachments in this forum

Search for:
Jump to: