6502.org Forum  Projects  Code  Documents  Tools  Forum
It is currently Mon May 20, 2024 8:44 pm

All times are UTC


Post new topic Reply to topic  [ 17 posts ]  Go to page 1, 2  Next
Author Message
PostPosted: Mon May 23, 2022 1:44 am 
Offline
User avatar

Joined: Wed Aug 18, 2021 1:35 am
Posts: 45
Location: South Australia
Rather than start a new thread for each update on this project, I've decided to create a single thread and update it as required. This is that thread.

Background

This is my second homebrew project after first completing a Ben Eater inspired SAP-1ish on a breadboard. Dipped my toe in 65C02 assembly working on some Commander X16 projects, so decided to do a 65C02 next. Loved the idea of a backplane where I can easily add/replace components of the build at will. I also have a soft spot for the TMS9918A having grown up with a TI-99/4A. So that was my starting point. (Yes, I'm quite a newbie at this - but have a very extensive background in software).

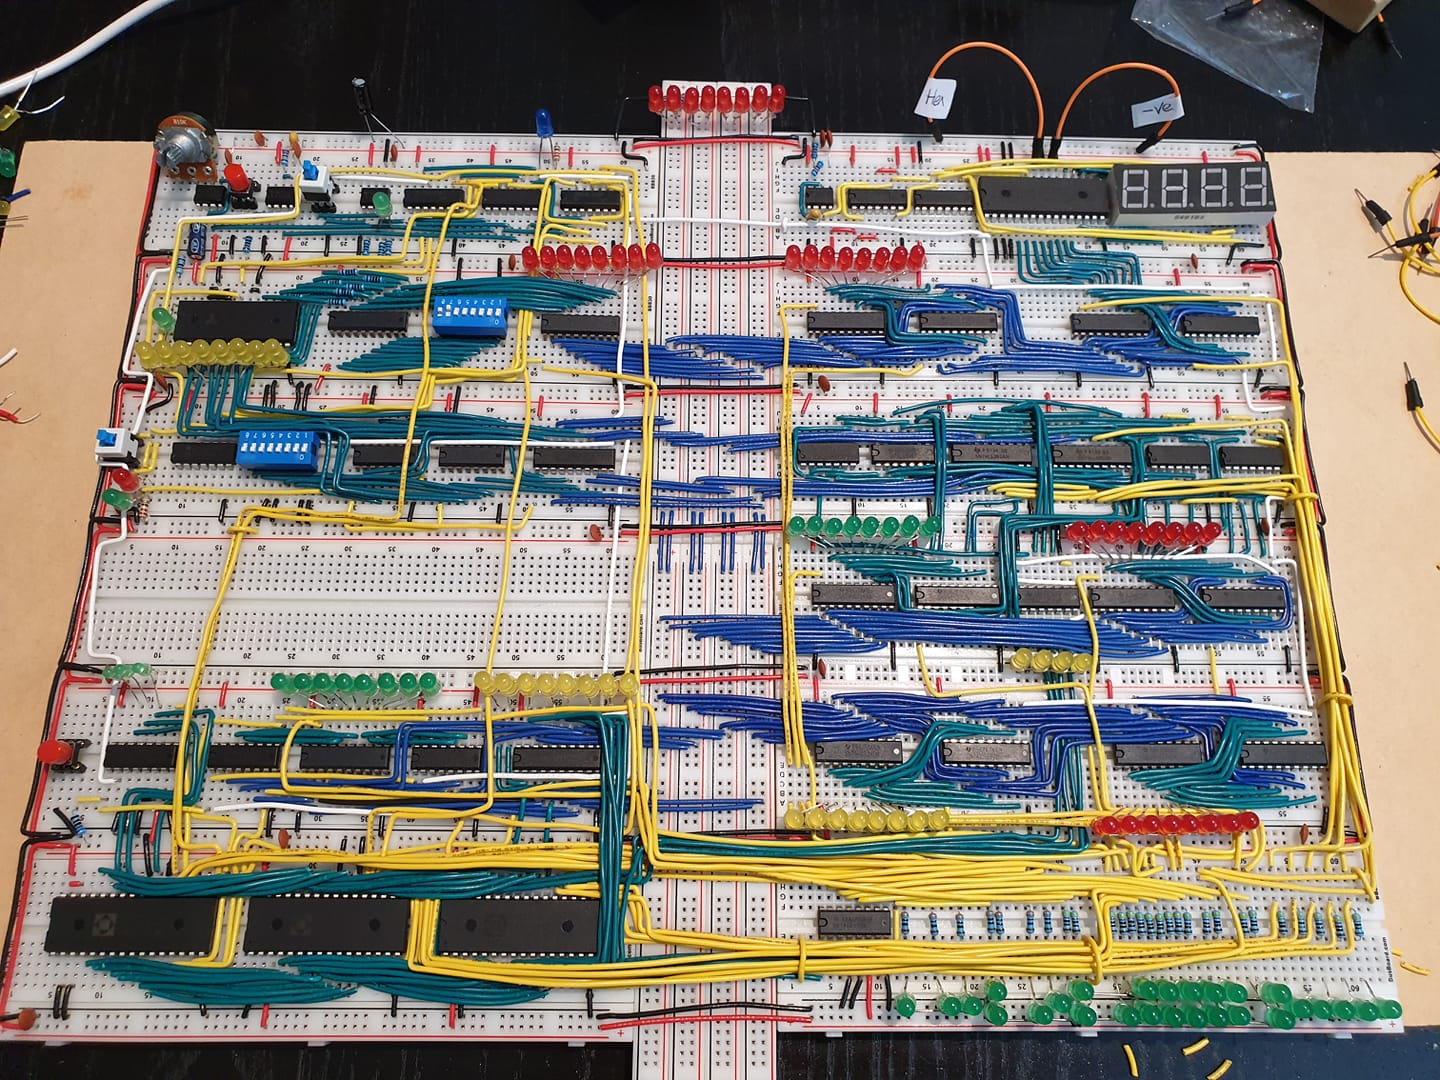
I started out building the project on breadboards, but then designed a backplane and custom proto card to start the build proper. I started out with a graphics LCD:

Image

Then built the TMS9918A card and added support for a NES controller:

Image

It was around this point I started working on the emulator. For this, I wrote my own 65C02 and TMS9918A emulator libraries and built both a desktop and web-based version. You can try the latest web version here (requires keyboard): https://visrealm.github.io/hbc-56/emulator/wasm

Not long after that, I was contacted by PCBWay who were keen to supply me with PCBs in return for mentioning them (nothing more than that). This surprised me as my project / YouTube, etc. has very few followers, but I decided to go ahead anyway. This gave me the perfect opportunity to design custom PCBs to replace the old hand-wired ones.

The brings me to the present day where I've started building out some of these new cards and documenting the process in video form. It's not all smooth-sailing and you might get something out of these. If you're interested in TMS9918A development, I'm planning to do some videos on that specifically soon (probably after the card build series).

Updates

28 May 2022

The new RAM/ROM card. It contains 64KB RAM + 32KB ROM with runtime-configurable selection of RAM or ROM in 4KB pages.

Image

23 May 2022

Video covering the schematic, PCB design, assembly and testing of my new TMS9918A display card

Image

16 May 2022

Video covering the schematic, PCB design, assembly, diagnosis, repair and testing of my new 65C02 CPU card

Image

Project links

GitHub: https://github.com/visrealm/hbc-56

YouTube: https://www.youtube.com/playlist?list=PLhBwUsBsKBEMxZFNBWzE2UhNCxNknMrcR

Emulator (live online instance, requires keyboard) : https://visrealm.github.io/hbc-56/emulator/wasm

Hackaday: https://hackaday.io/project/180904-hbc-56-65c02-tms9918a-on-a-backplane

_________________
Cheers
Troy

[My introduction]


Last edited by visrealm on Sat May 28, 2022 2:01 pm, edited 3 times in total.

Top
 Profile  
Reply with quote  
PostPosted: Mon May 23, 2022 7:39 am 
Offline
User avatar

Joined: Thu Dec 11, 2008 1:28 pm
Posts: 10802
Location: England
Great! Look forward to any further updates.


Top
 Profile  
Reply with quote  
PostPosted: Tue May 24, 2022 8:45 am 
Offline
User avatar

Joined: Wed Aug 18, 2021 1:35 am
Posts: 45
Location: South Australia
All five cards now built. Updates for each to follow in coming weeks.

Image

_________________
Cheers
Troy

[My introduction]


Top
 Profile  
Reply with quote  
PostPosted: Tue May 24, 2022 9:12 am 
Offline
User avatar

Joined: Fri Aug 30, 2002 1:09 am
Posts: 8440
Location: Southern California
The construction is very neat.

_________________
http://WilsonMinesCo.com/ lots of 6502 resources
The "second front page" is http://wilsonminesco.com/links.html .
What's an additional VIA among friends, anyhow?


Top
 Profile  
Reply with quote  
PostPosted: Wed May 25, 2022 12:53 am 
Offline

Joined: Fri Mar 18, 2022 6:33 pm
Posts: 449
Hey Troy, I think the wiring on the perfboard version looks really nice. Would you mind describing your technique? I had the devil of a time with my LCD board; I ended up using a kind of hybrid wire wrap / solder, and it looks like a bird's nest.

_________________
"The key is not to let the hardware sense any fear." - Radical Brad


Top
 Profile  
Reply with quote  
PostPosted: Wed May 25, 2022 1:31 am 
Offline
User avatar

Joined: Wed Aug 18, 2021 1:35 am
Posts: 45
Location: South Australia
Paganini wrote:
Hey Troy, I think the wiring on the perfboard version looks really nice. Would you mind describing your technique?


Thanks!

I use 30AWG wire-wrapping wire which I think helps a lot. I do 100% of the wiring on the back which makes the front look super-tidy, but adds a bit of difficulty (have to reverse everything in my mind).

I like the wire wrapping wire because I can strip the ends with my fingers and can fit multiple wires in a single hole if need be. Stuff it in, a bit of BluTack to hold it. Flip the board, solder, repeat.

Also, my perfboard cards I custom designed. They have some features which improve tidyness.

  • ICs are intended to straddle the power rails, so power is super convenient.
  • There are traces which can jump each IC section vertically which reduces wiring.

Here's a better look at the PCB layout:

Image

_________________
Cheers
Troy

[My introduction]


Top
 Profile  
Reply with quote  
PostPosted: Wed May 25, 2022 2:17 am 
Offline
User avatar

Joined: Wed Aug 18, 2021 1:35 am
Posts: 45
Location: South Australia
GARTHWILSON wrote:
The construction is very neat.


Thanks, Garth.

Surprising, really. This is my first project with custom PCBs. A couple of minor bodges on two of these new cards, but all work. Even the backplane is revision 1 from ~12 months ago. I have a few minor mods planned for it, but not enough to re-spin it... yet.

For a complete novice, I'm certainly happy with it.

_________________
Cheers
Troy

[My introduction]


Top
 Profile  
Reply with quote  
PostPosted: Wed May 25, 2022 2:02 pm 
Offline

Joined: Fri Mar 18, 2022 6:33 pm
Posts: 449
visrealm wrote:
Also, my perfboard cards I custom designed. They have some features which improve tidyness.

  • ICs are intended to straddle the power rails, so power is super convenient.
  • There are traces which can jump each IC section vertically which reduces wiring.

Here's a better look at the PCB layout:


Very cool! Am I right in thinking that the horizontal rows of pairs - like this:

Code:
OOOO
||||
OOOO


make it so you never have to try and solder a wire to an IC (socket) pin?

_________________
"The key is not to let the hardware sense any fear." - Radical Brad


Top
 Profile  
Reply with quote  
PostPosted: Wed May 25, 2022 10:20 pm 
Offline
User avatar

Joined: Wed Aug 18, 2021 1:35 am
Posts: 45
Location: South Australia
Paganini wrote:
so you never have to try and solder a wire to an IC (socket) pin?


That's the idea, yeah. There have been cases where I've still had to do it, but can usually avoid.

_________________
Cheers
Troy

[My introduction]


Top
 Profile  
Reply with quote  
PostPosted: Sat May 28, 2022 2:01 pm 
Offline
User avatar

Joined: Wed Aug 18, 2021 1:35 am
Posts: 45
Location: South Australia
The next HBC-56 video is now available. This time covering the new RAM/ROM card. It contains 64KB RAM + 32KB ROM with runtime-configurable selection of RAM or ROM in 4KB pages.

Image

_________________
Cheers
Troy

[My introduction]


Top
 Profile  
Reply with quote  
PostPosted: Wed Jun 01, 2022 1:39 pm 
Offline
User avatar

Joined: Wed Aug 18, 2021 1:35 am
Posts: 45
Location: South Australia
A brief montage of mostly unreleased footage covering the first 12 months of my HBC-56. From breadboards to custom protoboards to today.

Image

_________________
Cheers
Troy

[My introduction]


Top
 Profile  
Reply with quote  
PostPosted: Wed Jun 01, 2022 4:35 pm 
Offline
User avatar

Joined: Tue Aug 11, 2020 3:45 am
Posts: 311
Location: A magnetic field
visrealm on Wed 25 May 2022 wrote:
Stuff it in, a bit of BluTack to hold it. Flip the board, solder, repeat.


I've tried to introduce people to the merit of solder tack but I've had little success. Tack is *particularly* good if you want 5mm LEDs to point in the same direction. Anyhow, if you have more tricks like that, it would explain your tidiness and success.

_________________
Modules | Processors | Boards | Boxes | Beep, Beep! I'm a sheep!


Top
 Profile  
Reply with quote  
PostPosted: Thu Jun 02, 2022 2:22 am 
Offline
User avatar

Joined: Wed Aug 18, 2021 1:35 am
Posts: 45
Location: South Australia
Sheep64 wrote:
visrealm on Wed 25 May 2022 wrote:
Stuff it in, a bit of BluTack to hold it. Flip the board, solder, repeat.


Tack is *particularly* good if you want 5mm LEDs to point in the same direction.


For my breadboard CPU which had a bunch of rows-of-8 LEDs, I made a jig out of a piece of old plastic cutting board by drilling 8 holes in it. Shoved 8 LEDs in the jig and soldered them all together with a piece of solid core wire. Worked quite well (for a breadboard build).

Image

_________________
Cheers
Troy

[My introduction]


Top
 Profile  
Reply with quote  
PostPosted: Tue Jun 14, 2022 12:09 pm 
Offline
User avatar

Joined: Tue Aug 11, 2020 3:45 am
Posts: 311
Location: A magnetic field
In one of your videos, I note that your component boxes are exceptionally tidily labeled to the extent that manufacturer logos or a picture of the component is in a fixed place on each box. That saves time if the boxes are shuffled.

Regarding 5mm LED alignment, it did not occur to me that scrap plastic would be suitable as a jig. Actually, if you are more able than me with plastic and you seek suggestions for an enclosure, I recommend using imitation Lego baseplates. I've been gluing white ones together and adding striped trim. (Warning: it is possible to waste days on decorative trim.) The bright colors match your white prototyping boards and wiring. Baseplates are also available in black and this would match your black cards with the exception of that lovely line curved corners. Anyhow, baseplates are typically available with 16*16 studs (128mm*128mm), 16*32 studs (128mm*256mm), 20*20 studs (160mm*160mm) or 32*32 studs (256mm*256mm) and powers of two are highly suitable for Space Invaders or PacMan bitmaps. Indeed, a PacMan power-up pill would work very well as a power button. Baseplates are also available in gray and beige, although if you want to use smaller imitation Lego pieces around power buttons, MicroSD slots and similar, mid colors have the worst color matching. It is also easy to mix molded and 3D printed pieces.

_________________
Modules | Processors | Boards | Boxes | Beep, Beep! I'm a sheep!


Top
 Profile  
Reply with quote  
PostPosted: Mon Jun 20, 2022 3:21 am 
Offline
User avatar

Joined: Wed Aug 18, 2021 1:35 am
Posts: 45
Location: South Australia
Sheep64 wrote:
In one of your videos, I note that your component boxes are exceptionally tidily labeled to the extent that manufacturer logos or a picture of the component is in a fixed place on each box. That saves time if the boxes are shuffled.


Thanks. I tried to do them in Excel, then Word, but it was a pain to set them up right. I ended up making them in paint.net - printed to an sticker A4 sheet and cut out with a ruler and a hobby knife. They turned out quite well I think.

For those who haven't seen them:

Image

_________________
Cheers
Troy

[My introduction]


Top
 Profile  
Reply with quote  
Display posts from previous:  Sort by  
Post new topic Reply to topic  [ 17 posts ]  Go to page 1, 2  Next

All times are UTC


Who is online

Users browsing this forum: No registered users and 4 guests


You cannot post new topics in this forum
You cannot reply to topics in this forum
You cannot edit your posts in this forum
You cannot delete your posts in this forum
You cannot post attachments in this forum

Search for:
Jump to: